Pushing Java Envelope – Part 5: Basic Initializations

03/05/2017

What happens when we run a Java code? Actually, many things occur in a predefined order. Basically, Java tries to run the main() method but before that, an environment must be set. Each runtime has a setup. For Java, certain classes must be loaded. Let’s take a look in an example.

Class Loading

I am using macOS 10.12.4 and Java 1.8.0_92-b14 right now. To get the java version, we can write in command line

java -version

The command java has a parameter to see the classes that are loaded to be run. While getting the version information, we can also learn which classes are being loaded by the JVM to execute that command.

java -verbose:class -version

I did not expect that but the output is really too long to put it here completely. It just starts with this:

init1

ending like this:

init2

If I am not mistaken, there are 352 different class that are loaded to show the version of Java. When I compile and run a very simple class, the number of classes to be loaded for the environment setup increases. It becomes 418 classes. The rt.jar (runtime) file contains all the core Java .class files. The important observation here is that, class loading is interrupted when “something” happens. For example, java version is printed and after that java.lang.Shutdown is loaded. Those “something” is the initializations.

Order of Initializations

We will keep the track of actions over a single code. 

package blog.mertersualp.inits;

public class Initializations { //1
  static { //2
    System.out.println("Class Initalization runs.");
  }
  
  { //3
    System.out.println("Object Initialization Part-1 runs.");
  }
  
  public Initializations() { //4
    System.out.println("Constructor runs.");
  }
  
  public static void main(String[] args) { //5
    System.out.println("main() method runs.");
    Initializations init1 = null;
    System.out.println("What will run next?");
    Initializations init2 = new Initializations();
  }
  
  { //6
    System.out.println("Object Initialization Part-2 runs.");
  }
}

The code above has a few caveats. Each { is the beginning of a code block. So, in here, we have 6 code blocks in total. I have numbered them with comments for reference. Let’s skip the one enclosing the whole class (// 1) and focus on the others. The second code block, //2, is a static one. It is called a Class Initializer, since it will be run in order of appearence, when the class is initialized, not an object of it. The Object Initializers are numbers //3 and //6. When an object of class Initializations is created, these will be run, again, in order of appearance. Hence, we can conclude that “Object Initialization Part-1 runs.” will be printed before “Object Initialization Part-2 runs.” The code block for the constructor of class Initializations is number //4. As the last one, the main() method code is inside block number //5.

Java will first try to find the public static void main(String[] args) method and run it. Java Language Specification states that, anytime a static field or method of a class is accessed, class initializers are run. Since main() is a static method, the very first code block to be run should be //2, which is the static code block. The first line in the console output will be “Class Initialization runs.” So we are inside main() now. It will print “main() method runs.” as the second line. Now here comes the tricky part. An Initializations object, init1 is declared and set to null. Therefore, an object creation/allocation should NOT occur. This means that, “What will run next?” line must be printed before any object specific output.

The init2 object is set by a new object allocation. Since an object is created, the object initialisers and a constructor should be run. The object initialisers always run BEFORE the constructor, since the operations inside a constructor may depend on these object initialisations. Therefore, the last three lines will be “Object Initialization Part-1 runs.”, “Object Initialization Part-2 runs.” and “Constructor runs.”

Here is the final output.

init3


Pushing Java Envelope – Part 4: boolean’s && Boolean’s

23/04/2017

Java has primitive types and reference types. The difference is that, the primitive types are not treated as objects, while reference types are almost always objects. Depending on this, there are many places where strictly reference types are required. For example Collections. When we want to create a list of booleans, we must code as

List<Boolean>

The important part here is the Boolean class. Although our intent is to use the boolean primitive type, Collections directs us to use the Boolean wrapper class. This has important consequences. Somehow, we need to transform primitive types back and forth to the wrapper class. Thankfully, from version 5 and on, Java can do this automatically if certain conditions hold. For other cases, Java presents different constructors and static methods. 

In the case of primitive types, the boolean is very simple. There only exists true and false. The comparison between two boolean values can simply be done by the == binary operator. However, the wrapper class Boolean complicates the issue.

Creating a Boolean

The use of == with primitive boolean type has a very strong influence on using it with Boolean objects. Long time Java developers know that applying == operator for comparing objects should be avoided. However, in the case of Boolean class, there are only two Boolean.TRUE and Boolean.FALSE static objects. It is so tempting to type == in place of equals(). How error-prone can it be to use it for a class that only needs two objects? In fact, it can cause headaches.

When we look at the Boolean class, we see two constructors. One for converting from a boolean value, and one for converting from a String. There is a very important effect of these constructors. As their purpose of existence, they CREATE (or in Java doc terms ALLOCATE) new objects. To see what they really do, I have read the source code. To get those, we must download JDK. In macOS, we can find the Java source codes under

/Library/Java/JavaVirtualMachines/jdk1.8.0_121.jdk/Contents/Home/

There is a src.zip file. Java creators make our lives easier by mirroring the package class locations to source files. Therefore, to get the Boolean.java file, we look for java/lang folders. Both of the constructors are like this:

public Boolean(boolean value) {
  this.value = value;
}

public Boolean(String s) {
  this(parseBoolean(s));
}

public static boolean parseBoolean(String s) {
  return ((s != null) && s.equalsIgnoreCase("true"));
}

The String “true” is case insensitive, but any leading or trailing whitespaces make the object FALSE. Also, please do not forget the parseBoolean() method. We will talk about it later on. Let’s make a quick fact check.

public static void main(String[] args) throws Exception {
  Boolean boolTrueOne = new Boolean(true);
  Boolean boolTrueTwo = new Boolean(true);
  if (boolTrueOne == boolTrueTwo) {
    System.out.println("== comparison is true.");
  }
  if (boolTrueOne.equals(boolTrueTwo)) {
    System.out.println("equals() is true.");
  }
}

The naive expectation is:

  • there are two booleans 
  • they are true
  • they are equal
The truth is:
  • there are two Boolean objects
  • their values are true
  • they are different objects, so they are NOT equal

We can verify it with the following output.

bool1

It is exactly the same for the constructor Boolean(String). The case INSENSITIVE input to that constructor will create different objects. Moreover, they are also different than the objects created by the first constructor.

package blog.mertersualp.booleans;

public class BooleanObjectCreations {
  public static void main(String[] args) throws Exception {
    Boolean boolTrueOne = new Boolean(true);
    Boolean boolTrueTwo = new Boolean(true);
    if (boolTrueOne == boolTrueTwo) {
      System.out.println("== comparison is true.");
    }
    if (boolTrueOne.equals(boolTrueTwo)) {
      System.out.println("equals() is true.");
    }
    
    Boolean boolTrueOneFromString = new Boolean(“TRue");
    Boolean boolTrueTwoFromString = new Boolean("true");
    if (boolTrueOneFromString == boolTrueTwoFromString) {
      System.out.println("== comparison is true.");
    }
    if (boolTrueOneFromString.equals(boolTrueTwoFromString)) {
      System.out.println("equals() is true.");
    }
    
    if (boolTrueOne == boolTrueTwoFromString) {
      System.out.println("== comparison is true.");
    }
    if (boolTrueOne.equals(boolTrueTwoFromString)) {
      System.out.println("equals() is true.");
    }
  }
}

bool2

As now we expect, three comparisons made by the == operator all yield to false. Yet, a subtle modification, however, will instantly make all comparisons accepted. 

package blog.mertersualp.booleans;

public class BooleanObjectCreations {

  public static void main(String[] args) throws Exception {
    Boolean boolTrueOne = new Boolean(true);
    Boolean boolTrueTwo = new Boolean(true);
    if (boolTrueOne.booleanValue() == boolTrueTwo) {
      System.out.println("== comparison is true.");
    }
    if (boolTrueOne.equals(boolTrueTwo)) {
      System.out.println("equals() is true.");
    }
    
    Boolean boolTrueOneFromString = new Boolean("TRue");
    Boolean boolTrueTwoFromString = new Boolean("true");
    if (boolTrueOneFromString.booleanValue() == boolTrueTwoFromString) {
      System.out.println("== comparison is true.");
    }
    if (boolTrueOneFromString.equals(boolTrueTwoFromString)) {
      System.out.println("equals() is true.");
    }
    
    if (boolTrueOne.booleanValue() == boolTrueTwoFromString) {
      System.out.println("== comparison is true.");
    }
    if (boolTrueOne.equals(boolTrueTwoFromString)) {
      System.out.println("equals() is true.");
    }
  }
}

bool3

What has changed? The only modification we did is supplying the primitive value of Boolean object that it represents to the left side of the == binary operator. This is done by the method written in bold, booleanValue(). Here is the source code:

public boolean booleanValue() {
  return value;
}

Having a primitive type on the left (or right) of the == binary operator changes the dynamics. Before, == operator simply wants to learn wether its operands are the same objects. It does not look at their values, but only there memory locations. When at least one operator becomes a primitive type, Java implicitly converts the non-primitive (i.e. reference) type into its corresponding primitive type. This is called unboxing. In Java terms, the reference type class is Wrapper class. The boolean primitive type is wrapped by Boolean class. The unboxing is replacing the object with its <primivite type>Value() method. Remember that we explicitly called the booleanValue() method for one operand. Java compiler implicitly makes the very same call for the other operand of ==. Therefore, all these operations reduces to primitive type checking. 

The parseBoolean(String) method may be preferred in place of Boolean(String) constructor. It directly converts the input string into its corresponding primitive boolean value.

Reusing static Booleans

There is another way to handle Boolean objects. At the very beginning of this post, I mentioned Boolean.TRUE and Boolean.FALSE static objects. The Boolean class contain those:

public static final Boolean TRUE = new Boolean(true);
public static final Boolean FALSE = new Boolean(false);

These two objects are created when the Boolean class is initialised. From then on, we can always access them. We can also assign them to our declared objects instead of creating new Boolean objects each time. Now, let’s replace object creation with these static fields and remove the booleanValue() methods.

package blog.mertersualp.booleans;

public class BooleanObjectCreations {

  public static void main(String[] args) throws Exception {
    Boolean boolTrueOne = Boolean.valueOf(true);
    Boolean boolTrueTwo = Boolean.valueOf(true);
    if (boolTrueOne == boolTrueTwo) {
      System.out.println("== comparison is true.");
    }
    if (boolTrueOne.equals(boolTrueTwo)) {
      System.out.println("equals() is true.");
    }
    
    Boolean boolTrueOneFromString = Boolean.valueOf("TRue");
    Boolean boolTrueTwoFromString = Boolean.valueOf("true");
    if (boolTrueOneFromString == boolTrueTwoFromString) {
      System.out.println("== comparison is true.");
    }
    if (boolTrueOneFromString.equals(boolTrueTwoFromString)) {
      System.out.println("equals() is true.");
    }
    
    if (boolTrueOne == boolTrueTwoFromString) {
      System.out.println("== comparison is true.");
    }
    if (boolTrueOne.equals(boolTrueTwoFromString)) {
      System.out.println("equals() is true.");
    }
  }
}
bool4

Here, we only use single one object, which is the static final Boolean TRUE. SO, all comparisons, either object equality or value equality are all true.

Conclusion

What I like about the == operator while dealing with objects is not its comparison ability because it cannot do that properly. Its beauty is that it will teach us the underlying truth of the object’s origin. Is it a brand new object or does it refer to a previously created one? This answer to this question can be found by applying == to both operands.

Frankly, the == operator for objects is mostly used by mistake. Boolean objects inherently encourage this tendency, since they represent true and false. The techniques presented above may decrease the erroneous side effects.

Three take-aways from this study are:

  1. Using Boolean constructors should be avoided if no other way exists. Instead, applying the respective static valueOf() methods should be encouraged.
  2. If somehow Boolean constructors are (or must be) employed and different Boolean objects are created, converting them to primitive boolean values by booleanValue() method is invaluable.
  3. In the very end, we can reiterate an important but easily forgettable Java rule: Use equals() every time when comparing objects, not the == operator.

Pushing Java Envelope – Part 3: Packages & Imports

07/04/2017

The art of coding is in fact deciding on where to put a piece of code. It can be either within a file or distributing it to different files. However, putting code into many files create a few problems. First one is name conflicts. Suppose that there are two java class files containing different classes but having the same name. When we refer to that class, we must uniquely specify which one is our preference. There should be no ambiguity. The second problem is access protection. When we define a class, we may want to preserve its use to only related classes. To solve these problems, Java presents the package mechanism.

Declaring Packages

A class may not be a part of a package but for the reasons above, it is highly recommended to do so. If we do not explicitly declare its package, a class is a member of default package. The packages are generally named by reversing the domain name of the companies. In my case, I am using mertersualp.blog as my URL and reversing it will result blog.mertersualp. Hence, my packages will start with this. The dot is the separator. We cannot use dot in our package names. Actually, the package naming rules are exactly the same with variable naming ones. The package name, or a part just after the separating dot, may start with a letter, underscore(_), or dollar sign($). After that, the numbers may also appear with these characters. A small example file with its package declaration is here:

package blog.mertersualp.imports;

public class ImportTests {
  public static final int LIMIT = 10;
  
  public static void main(String[] args) {
    System.out.println("ImportTests main method is running.");
  }
  
  public int nonStaticMethod() {
    System.out.println("ImportTests nonStaticMethod is running.");
    return 2;
  }
}

In Java, there is a clear distinction between the location of the .java source code and the location of the .class file. The .java source code file can be anywhere in the file system. It is only used while compiling. However, the important part is the location of the .class file. To be used properly, it must be “somewhere” under the java class path. In any operating system, we can set the system CLASSPATH variable with one or more file system locations. Another method is providing the preferred path as the class path by using the -cp parameter while compiling the source codes. If we do not explicitly define it, the default class path will be the current directory. Let’s see what happens when the code above is compiled simply with this:

javac ImportTests.java

The result is having the compiled .class file in the same location with the .java source code file. That seems OK until we run it like this:

java ImportTests

Ups… Hitting a roadblock.

roadblock

The problem here is that, java cannot find the class because, for each path in the java class path, it is looking for it under the blog/mertersualp/imports folder. So, one effect of package declaration is that, the .class presents itself under the folder structure defined exactly as the package declaration. There must be a way to put the compiled .class file to its proper place. This can be done by using the -d parameter while compiling the source code. With that, we specify the folder where the packaging structure begins. In our example, the absolute path of the source code is

/Users/merter/Documents/javaSpace/ImportTests.java

The following compilation command will compile this file and put it under the proper place for the class. If the package folders are missing, compiler will create them. But the path provided to the -d parameter must exist beforehand.

javac -d /Users/merter/Documents/javaSpace /Users/merter/Documents/javaSpace/ImportTests.java

This will create the file structure under the /Users/merter/Documents/javaSpace folder. So, the final ImportTests.class file can be found in /Users/merter/Documents/javaSpace/blog/mertersualp/imports/

With all these in place, we can run the .class file in two different ways:

java -cp /Users/merter/Documents/javaSpace blog.mertersualp.imports.ImportTests
java -cp /Users/merter/Documents/javaSpace blog/mertersualp/imports/ImportTests

proper placement

We can compile simultaneously more than one class, which may or may not share the same package. Suppose that we have another class, ImportChildTests.java. It is not in the same package, but its package is under that. In Java terminology, this is a child package. The code is here.

package blog.mertersualp.imports.children;

public class ImportChildTests {
  public static final int CHILD_LIMIT = 5;

  public static void main(String[] args) {
    System.out.println("ImportChildTests main method is running.");
  }
  
  public int nonStaticMethod() {
    System.out.println("ImportChildTests nonStaticMethod is running.");
    return 1;
  }
}

This class is more or less the same with the first one. Assuming that both these source codes are in the same location, and we are also in that folder, we can compile them with the following command:

javac -d . Import*.java

The two paths, /Users/merter/Documents/javaSpace/blog/mertersualp/imports/ and /Users/merter/Documents/javaSpace/blog/mertersualp/imports/children/ are created, if they do not exist already, and the two .class files will be put under their corresponding locations. As we can see, the package declarations again dictate the final locations of the .class files.

Importing

Until here, we talked about compiling and finding the right class in the right place while running the programs. Here, we will try to understand what is needed and what happens when we access a class inside another package. Almost all classes Java developers use are contained within many different packages. There is only one exception to this, which is the java.lang package. It is so vital for Java that, it is literally impossible to do anything without it. Henceforth, it is imported implicitly for all Java classes. Other than those, every class accessed must be referred correctly. To do that, we must be sure of two things:

  • The referred class must exist under the class path, with its proper folder structure according to its package name
  • In the source code, that class must be explicitly imported

So we came to the point of importing classes. In Java, the first non-comment line of the source codes contains the package name. After that, the import expressions must be written. Either, we can make a single-type-import for that class/interface, or all classes/interfaces under a specific package. The “all” part is defined by an asterisk (). java.util. means all classes/interfaces of the java.util.package. There are two important points here. The first one is that, by this way, only classes/interfaces can be imported. The other one is, the child packages of java.util ARE NOT imported. They must be explicitly imported. In this case, if we want to use Semaphore class in java.util.concurrent package, we also need to import that class or all classes/interfaces inside java.util.concurrent. A List of Semaphores can be used as in below:

import java.util.List; //import java.util.* also fine
import java.util.concurrent.Semaphore; // java.util.concurrent.* also fine

public class ConcurrencyCollection {
  private List<Semaphore> listOfSemaphores;
}

The rule is: When a class/interface is referenced inside a Java code, its package name is prefixed and searched for in the class path. So, according to the above statements, when we refer to a List object, the compiler searches for java.util.List in the class path. This means that, we can also achieve the same result without using imports, but explicitly using fully-qualified names of the classes. The following code is perfectly valid.

public class ConcurrencyCollection {
  private java.util.List<java.util.concurrent.Semaphore> listOfSemaphores;
}

It is cumbersome to write the fully-qualified names of each class/interface, therefore import mechanism is used extensively. However, this representation is very important and can be a life saver in some situations. For example, let’s assume that we need to import all classes/interfaces in java.util and java.awt packages. We would like to have a List of Semaphores again.

import java.util.*;
import java.util.concurrent.*;
import java.awt.*;

public class ConcurrencyCollection {
  private List<Semaphore> listOfSemaphores;
}

ambiguity

Since List class/interface happens to be in both java.util and java.awt packages, compiler cannot decide which one we are trying to use. In this very specific case, we must use the fully-qualified name of the List interface. The small modification below makes everything ok again.

import java.util.*;
import java.util.concurrent.*;
import java.awt.*;

public class ConcurrencyCollection {
  private java.util.List<Semaphore> listOfSemaphores;
}

If the only class/interface we are interested in java.util package is the List, then we have another option.

import java.util.List;
import java.util.concurrent.*;
import java.awt.*;

public class ConcurrencyCollection {
  private List<Semaphore> listOfSemaphores;
}

Wow, it just compiled smoothly! The magic here is that, single-type-imports override wildcards. Throughout the source code file, the List will be assumed to be java.util.List. Therefore, single-type-imports for classes/interfaces can be a better choice when dealing with many imports. Of course, when the classes/interfaces having the same name are imported in a single-type fashion, the compiler refuses to proceed successfully, because of a collision. 

import java.util.List;
import java.util.concurrent.*;
import java.awt.List;

public class ConcurrencyCollection {
  private List<Semaphore> listOfSemaphores;
}
collision

Static Import

I said that the import mechanism only works for classes and interfaces but, frankly, it is not totally true. Starting with Java 5, a new way to import public static fields and methods was introduced. That is static import. The aim of it is to eliminate Constant Interface Anti-pattern. Software developers devised this anti-pattern to share the static fields in their many classes without a qualification. There are many frequently used constants, such as Math.PI, Integer.MAX_VALUE, Long.MIN_VALUE, e.g. To bypass their corresponding class names, an interface can be created and these values can be put into it as the only API. Abusing the interface mechanism can yield to significant problems. Instead, we can create single utility classes, put those public static fields as final. Then, use them by statically importing, which practically achieves the same result with lesser side-effects. Although it is a valid option, usage of it is generally discouraged.

Pushing Java Envelope – Part 2: public static void main(String[] args)

22/03/2017


Every Java program starts with the main() method. When the command java (or javaw) runs with a class name, it finds the byte code representation of that class (most probably the .class file), makes the necessary preparations, does some validation work and gives the control to the main() method. It is not an ordinary method though. It must conform some strict and a few flexible properties. These are:

  • must have a name main in all lowercase letters
  • must be public
  • must be static
  • must return nothing (i.e. void)
  • must take only one parameter and it must be a String array

Under the guidance of these, a very simple and valid main() method can be defined as:

public static void main(String[] args) {
System.out.println("I am the main: " + args.length);
}

The reason for being named as main() is most probably historic. The ancestors of Java programming language are C and C++. Their designated start-ups are the main() functions, hence Java also kept that tradition. To make the method visible from anywhere, the identifier public is set. These are all preferences. The starting method may have a very different name or it can be set to a different access modifier. Those were decided by the creators of Java. However, the identifier static has a logic behind it. Assume that we do not make it static. This means that, every object for that class has it’s own main() method and the class has none for itself. When we run java with the class name, java has information only about the class, not the objects. Besides, there are no objects at that time. So which main() method should be used? To avoid such ambiguity, the designers of Java make the starting main() method a feature of the class, not the objects, by adding the static identifier.

The order of appearance of the access modifier public and identifier static are interchangeable. It is almost universal to use public before static, but the following code is also valid.

static public void main(String[] args) {
System.out.println("I am the main: " + args.length);
}

The return type, void, must be just before the main() method name however. The following code won’t compile because the return type is not in it’s proper place.

void public static main(String[] args) {
System.out.println("I am the main: " + args.length);
}

Void public static

Since the input type must be an array of Strings, any valid array syntax is OK. So we can safely compile the following codes.

public static void main(String... args) {
System.out.println("I am the main: " + args.length);
}
public static void main(String args[]) {
System.out.println("I am the main: " + args.length);
}

Java defines the method signature as

  • the name of the method
  • the types of the parameters

The method signature does not contain anything about the parameter names. Therefore, the name of the input parameters is not important. Any valid Java identifier can be used. In the code below, otherThanArgs parameter name is used and accessed.

public static void main(String[] otherThanArgs) {
System.out.println("I am the main: " + otherThanArgs.length);
}

Although any main() method can conform these requirements, the main() method that will be run when java runs must also return the type void. If not, the compiler won’t give any errors because it will treat that like any other method. The following code compiles perfectly.

public static int main(String[] args) {
System.out.println("I am the main: " + args.length);
return 0;
}

When this is run by java, it will complain that the main() method must return void, as in here:

NonVoidReturn

As another case, it must accept String array as its only parameter. Any other type is strictly prohibited in run-time. For example, when we supply integer array as the only parameter, again, compilation will succeed, but when running, we will be informed that there is no suitable main() method to be started.

public static void main(int[] otherThanStringArray) {
System.out.println("I am the main: " + otherThanStringArray.length);
}

Main int

Actually, all these imply that the main() is a very unique case of any generic method. If we want it to be run with java command, we must obey the very first rules presented above. If not, we are free to design it anyhow we like, since main is NOT a keyword in Java. In either case, we can call main() method as any other method. In the following example, the overloaded main() methods in class DifferentMainMethods are called from another class OtherClassMainCaller

public class OtherClassMainCaller {
public static void main(String[] args) {
System.out.println("I am the other main");
DifferentMainMethods.main(args);
DifferentMainMethods.main(new int[] {1, 2, 3});
}
}

public class DifferentMainMethods {
public static void main(String[] args) {
System.out.println("I am the main: " + args.length);
}

public static void main(int[] otherThanStringArray) {
System.out.println("I am the main: " + otherThanStringArray.length);
}
}

Let’s move over the code step by step. When the OtherClassMainCaller is run with the parameters “get ready for the action”, the main() method of it starts to run. It prints “I am the other main”. Later, the control is transfered to the main(String[]) method of class DifferentMainMethods. Since there are two classes of the same name in that class, I explicitly show the parameters. In fact, this method is the one if DifferentMainMethods was called from command line. It prints “I am the main: ” and the number of parameters it is supplied, which is 5. It is done, so returns back to main() of OtherClassMainCaller. Now, this time, the main(int[]) method of DifferentMainMethods is called. It gets an integer array of three elements. So, it writes “I am the main: ” and 3. Since there is no more instructions, the program terminates. The result on the secreen is like this:

DubleMainCaller

The main() method is also so similar to other methods that it may even throw exceptions.

public class ExceptionThrowingMain {
public static void main(String... args) throws Exception {
System.out.println("Watch out!");
throw new Exception();
}
}

Here, the main() method artificially throws a checked exception. I preferred checked one but we can also throw an unchecked one, like NullPointerException. Running this will result the following output, as expected.

Throws

Throwing an exception also means there is a way to catch it. In another class, ExceptionCatchingMain, I call the very same main() method of ExceptionThrowingMain and caught the exception.

public class ExceptionCatchingMain {
public static void main(String[] args) {
try {
System.out.println("I will catch.");
ExceptionThrowingMain.main(args);
} catch (Exception ex) {
System.out.println("Here is the exception.");
}
}
}

 Running this will first print “I will catch.” Then, the other main method will print “Watch out!” and throw the exception. Since the main() method of ExceptionCatchingMain waits for it, it will print the last line, which is “Here is the exception.”


Catches

Pushing Java Envelope – Part 1: Java Class File

03/03/2017


For a few days, I am working on Java to get OCA certificate. To be honest, my initial thinking was that, with a little bit of study, I would easily pass it. However, when I started to practice, I understood that the exam tries to trick you while asking fundamentals of Java. It also makes us double think on the aspects of the programming language that we all took for granted. As I dive deeper, I found many things that Java permits but we do not use that much. In this post, I will start with basics and present codes that emphasis each point.

Java Class File

In Java, every application has one or many classes, since everything depend on them. The basic class file presents the fields, methods of the class. Also, we can learn how to initialize an object of that class by the same file. The interesting point is, there may be more than one class in a file. I am not talking about inner classes. What I mean is, in the same file, there can be more than one class definition independent of each other. Here is an example MultipleClasses.java file content that is perfectly valid:

public class MultipleClasses {
  int a = 5;
  private Helper helper = new Helper();

public static void main(String[] args) {
MultipleClasses mc = new MultipleClasses();
System.out.println(mc.helper.getB());
}
}
class Helper {
  private int b;
 
public int getB() {
return this.b;
}

public static void main(String[] args) {
System.out.println("How may I help you?");
MultipleClasses mc = new MultipleClasses();
System.out.println(mc.a);
}
}

Now let’s move step by step and see what happens. First, compiling the code. Since the file name is MultipleClasses.java, we will run:

javac MultipleClasses.java

Multiple Class Files

It compiles and generates 2 .class files! One is MultipleClasses.class and the other one is Helper.class. If we had gone with the inner classes, what we would have gotten was again two classes but the latter one being MulitpleClasses$Helper.class. Here we understand that the two classes in the same file are totally different classes. We can add as many classes as possible in the same file, generating .class files for each. This result is exactly the same when we have files dedicated to each class. Each class has its own main() method so we can run MultipleClass and Helper with the java command.

When we run MultipleClass, the main() of that class takes control. It creates a MultipleClasses object. For that, the control is transferred to the instance initializer. We see that the package-private field a is set to integer literal 5. Also, another Helper object is created and set to the private field helper. That means, the control is now inside Helper instance initializer. There, we only reset the private integer field b to 0 and return to the MultipleClasses instance initializer. Since there is nothing to be left in the MultipleClasses instance initializer, it returns to the main() method.

The objects are ready so we can print the b field of helper. One of the important points here is that, we cannot access private fields of helper object from MultipleClass. There will be a compile-time error if we try to directly access the private b field inside the Helper object from MultipleClass object. That’s why I added the public getB() method to Helper class. We expected to and now see a 0 (zero) on the screen.

MulipleClasses Stack

Following the same procedure, we can also generate the output of java Helper command. We again start with the main() method but this time, it is the main() method of Helper class. It prints “How may I help you?” in a new line first. After that, it creates a new instance of MultipleClasses. The control is transferred to its instance initializer. It sets 5 to package-private field a. Again, another Helper object is created and set to the private field helper. That means, the control is now inside Helper instance initializer. There, we only reset the private integer field b to 0 and return to the MultipleClasses instance initializer. It has nothing else to do, just returns back to main() method of Helper class. Here we will print the a field of newly created MultipleClasses object, which is named as mc. The small but significant change is that, for that field we DO NOT NEED a public getter to access. That is because that field is package-private.

Helper Running Stack

So the output of the Helper will be “How may I help you?” followed by 5 (five).

Multiple Java Runs


Restrictions

In Java, we can make the top-level classes either public or package-private (i.e. by not writing anything before class className). With more than one top-level classes in the same file, all classes can be package-private. In that case, we can give ANY name to the class file. I mean, really ANY NAME WE WANT. It does not have to be a class name. Java does not care the name of the java class file when there is no public class inside the .java file. The following, slightly modified example is just OK with the file name What.java

class MultipleClasses {
  int a = 5;
private Helper helper = new Helper();

public static void main(String[] args) {
MultipleClasses mc = new MultipleClasses();
System.out.println(mc.helper.getB());
}
}
class Helper {
private int b;

public int getB() {
return this.b;
}

public static void main(String[] args) {
System.out.println("How may I help you?");
MultipleClasses mc = new MultipleClasses();
System.out.println(mc.a);
}
}

As you can see, there is NO class named as What but the file name is What.java. 

If we want to make the classes inside the Java file public, that drastically changes everything. First, there can only be one public class per file. We cannot make both MultipleClasses and Helper public. Also, the public one now dictates the name of the Java class file. The very first example above illustrates that case. MultipleClasses is public so the name of the file must be MultipleClasses.java.

Packaging

There are many clues that takes us to the point that these classes inside the same class file are actually classes in the same package. To verify this, I created two more simple classes with their own class files. One of them, InPackage, will share the same package with MultipleClasses and Helper. The other one, OutPackage, will be totally out of their package. Also, I will modify MultipleClasses and Helper, so that each of them will try to access InPackage class.

There are two packages: experiment and other. MultipleClasses and Helper classes are in the same file, MultipleClasses.java. They are also in the experiment package. They both initialize an instance of InPackage class, which is in the InPackage.java file. The InPackage class also initializes one object from each. The key point is that, none of the java files import anything. That’s all below:

package experiment;
public class MultipleClasses {
int a = 5;
private Helper helper = new Helper();

public static void main(String[] args) {
MultipleClasses mc = new MultipleClasses();
System.out.println(mc.helper.getB());
InPackage inPackage = new InPackage();
System.out.println(inPackage.c);
}
}
class Helper {
private int b;

public int getB() {
return this.b;
}

public static void main(String[] args) {
System.out.println("How may I help you?");
MultipleClasses mc = new MultipleClasses();
System.out.println(mc.a);
InPackage inPackage = new InPackage();
System.out.println(inPackage.c);
}
}

The code for the simple InPackage class is here:

package experiment;
class InPackage {
int c = 3;
  public static void main(String[] args) {
Helper helper = new Helper();
System.out.println(helper.getB());
MultipleClasses mc = new MultipleClasses();
System.out.println(mc.a);
}
}

Packages

As you can see, these three classes belong to the same package. My aim is to show that, these can access each other without importing any other package. After comping two files, I run each class and get the outputs. You can see them below:

3 Classes Run

Without importing any other class, we can safely use each of them in their respective main() methods. See also that, both MultipleClasses and Helper access directly to the package-private field (c) of InPackage class, whereas the InPackage class can access the package-private field (a) of MultipleClasses. These show that all three classes belong to the same package.

Now let’s turn out attention to the OutPackage class. It exists inside the package named other. I will compile this class first without an import statement, then with it.

package other;
// import experiment.*;
public class OutPackage {
  public static void main(String[] args) {
Helper helper = new Helper();
System.out.println(helper.getB());
MultipleClasses mc = new MultipleClasses();
System.out.println(mc.a);
  }
}

When we comment out the import statement, the code does not compile since it cannot find anything about MultipleClasses and Helper.

Without Import Statement

When we import those two classes, the compiler still complains but for a different reason. It now knows about the classes but it also knows that Helper class is only package-private, which prohibits its direct use from a different package.

With Import Statement

Hence, we are sure that putting more than one class inside a single .java file makes them share the same package.

macOS System Preferences Pane Missing Icons

19/02/2017


The problem I had a few days ago was about System Preferences. As you can see below, two of the icons are missing. That case is different than missing or hidden items. Here, the items are visibile but their icons are nonexistent. What can be the problem and how can we solve it? A note of importance: you will need an administrator account for the solution.

Missing Icons for Notifications and Accessibility


When I search for a solution, many suggestions were about cleaning the cache or rebuilding the preferences plist file. However, none of them solved my problem. I also tried to find what is missing by checking my Time Machine backups. Sometimes having a regular backup cannot help you. That seems to be the unfortunate case but a small change of approach put me on the right track back. Instead of  solving the missing icon problem, I searched for a way to change the icons in System Preferences. A discussion thread enlightened me. There, I learnt the locations where these .prefPane “files” live. It is /System/Library/PreferencePanes. But the much more detailed explanation can be found in Apple Developer Library. As it is stated there, the .prefPane is actually a bundle, like the .app “files”!

prefPane Bundle!

There are familiar folders and files inside Contents. The Mach-O binary is under the MacOS folder. It is the executable file. The icons are all inside the Resources folder. That is the very place we are looking for. The Info.plist file contains the key-value pairs. These pairs define the essential properties to represent and run the corresponding preference pane. 

Info.plist file

Key-value pairs

I opened the Info.plist file with BBEdit. The icon which is shown in the System Preferences is defined by NSPrefPaneIconFile. In my case, it is set to be NotificationsPref.tiff. Looking inside the Resources folder, I see this:

Notifications icon file

The quick look visualization of that tiff file seems problematic. However, there is exactly the same file, NotificationsPref-SLSRTL.tiff. This one is OK. Now I have two options. The first one is, change the value in Info.plist file to NotificationsPref-SLSRTL.tiff. I tried that solution but it did not respond the way I expected. It did not show the icon in System Preferences. The second choice is to copy that file over NotificationsPref.tiff. By this way, I decided to fix the icon file. Actually, that worked.

New NotificationsPref icon file

And here is the result in System Preferences:

Notifications Icon comes back

As you can see, the Notifications icon came back. There is one more corrupted file icon. That is the Accessibility. The bundle name of it is UniversalAccessPref. I located the Info.plist file of it as in the way as Notifications. This time, I edited the file with Xcode. It is much more easier to follow with it.

Accessibility

Frankly, my aim was to do the same procedure for Accessibility. But there exists a new problem: No uncorrupted icon under the Contents folder. So how can I replace the broken one? I searched for a proper icon and decided on the default one. You can choose anyone you like. Mine is this. I downloaded and later saved it under the Resources folder, replacing the broken one.

New Accessibility Icon FileAnd here is the final result:

All Done


Comprehensive List of Apple Watch Faces and Complication Families

22/11/2016

While I was working on a side project, I needed to know which Apple Watch Face includes which complication families. A quick search provided me this Apple guidance. But is is not comprehensive and does not have the detail I would like. Therefore, I decided to generate my own version.

The table I put in here has basically four columns. First one is the name of the watch face. The number of complication locations is presented as the second column. The third one breaks down the total number into individual complication families. Here, the abbreviations stand for

  • MS: Modular Small
  • ML: Modular Large
  • US: Utilitarian Small-Utilitarian Small Flat
  • UL: Utilitarian Large
  • CS: Circular Small
  • XL: Extra Large

As the last one, I have added some notes, which state whether there are extra and probably unchangeable complications.

WATCH FACE COMPLICATION COUNT DETAIL NOTE
Utility 3 2US, 1UL
  • One extra for date
Simple 4 4US
  • One extra for date
Chronograph 3 3US
  • One extra for date
  • Extra stopwatch is free
Modular 5 4MS, 1ML
Activity Analogue 3 2CS, 1UL
  • Activity is free
  • Date is free
Activity Digital 3 2CS, 1UL
  • Activity is free
Colour 4 4CS
  • One extra for monogram
Mickey & Minnie 3 2US, 1UL
Numerals 1 1US
Motion 2 1US, 1UL
Astronomy
Solar
Timelapse 2 1US, 1UL
Photo Album 2 1US, 1UL
Photo 2 1US, 1UL
X-Large 1 1XL

iOS Apps for DigitalOcean

16/11/2016

One of the most important aspects of using DigitalOcean is accessing it via smartphones and tablets. Using the applications or even terminal to check the status of the server is extremely important. I am a member of the Apple ecosystem hence my primary concern is the iOS apps. In this post, I would like to share my experience with different apps that give the control of your servers in the DigitalOcean cloud. I ordered the apps simply by their names.

But in short: Droopls is the best but comes with a price. Prefer Manager for DigitalOcean. It is mostly same as Droopls but free.

Compass for DigitalOcean

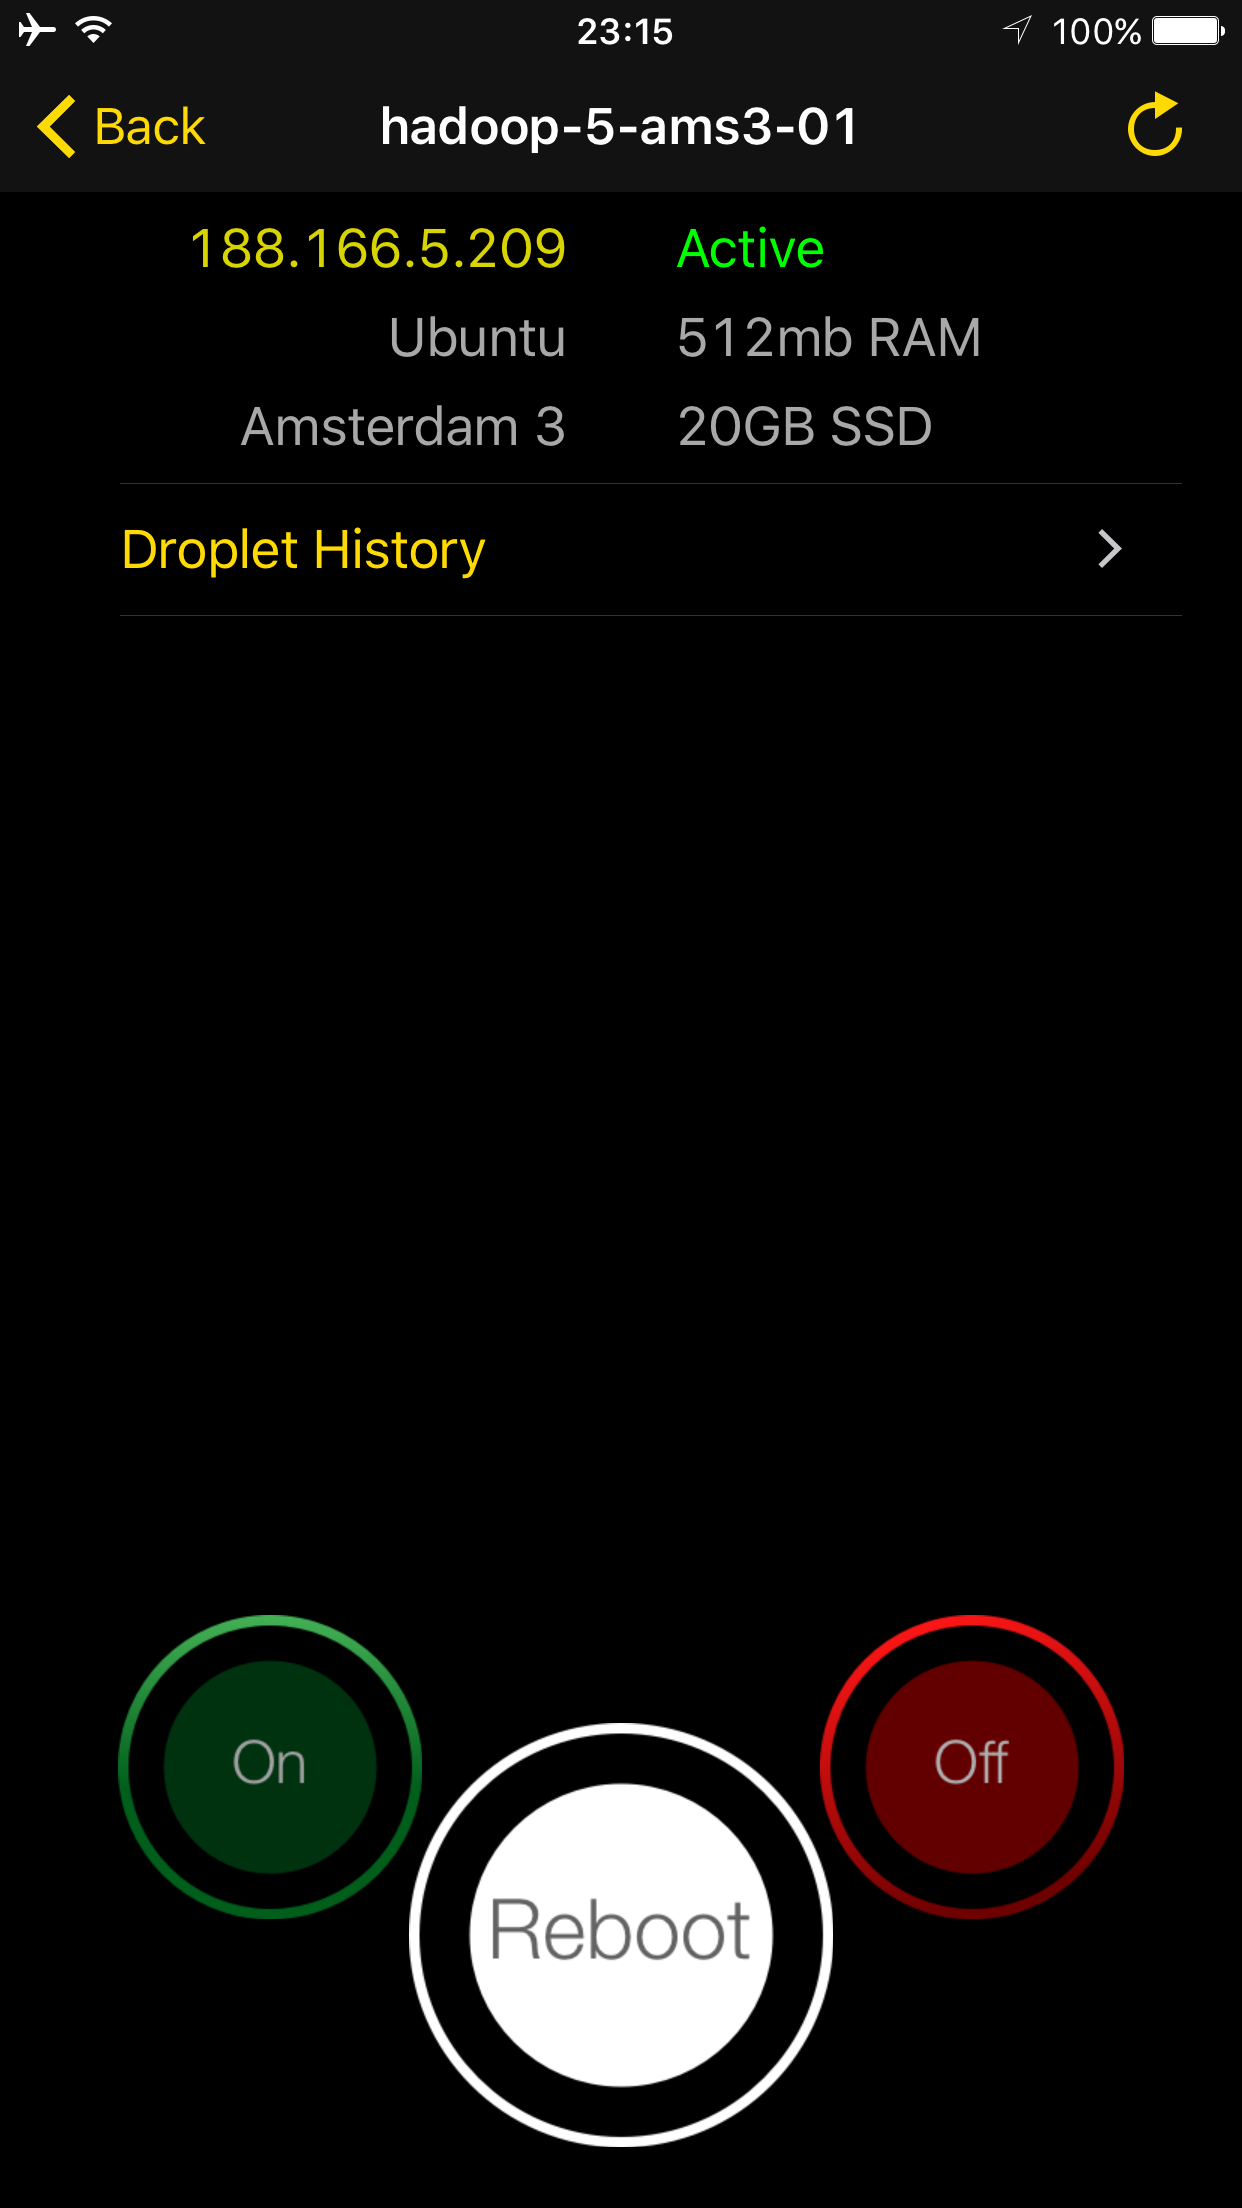
This iPhone app permits you to control your servers. The login process uses OAuth2 API of DigitalOcean. You can add more than one account. That is an important feature differentiating this app. For logins, your API key, if it exists, cannot be used. Only your user name, password and two factor authentication is applicable. Under your accounts, you will see your servers which belong to that specific account and their status.

Multiple Accounts

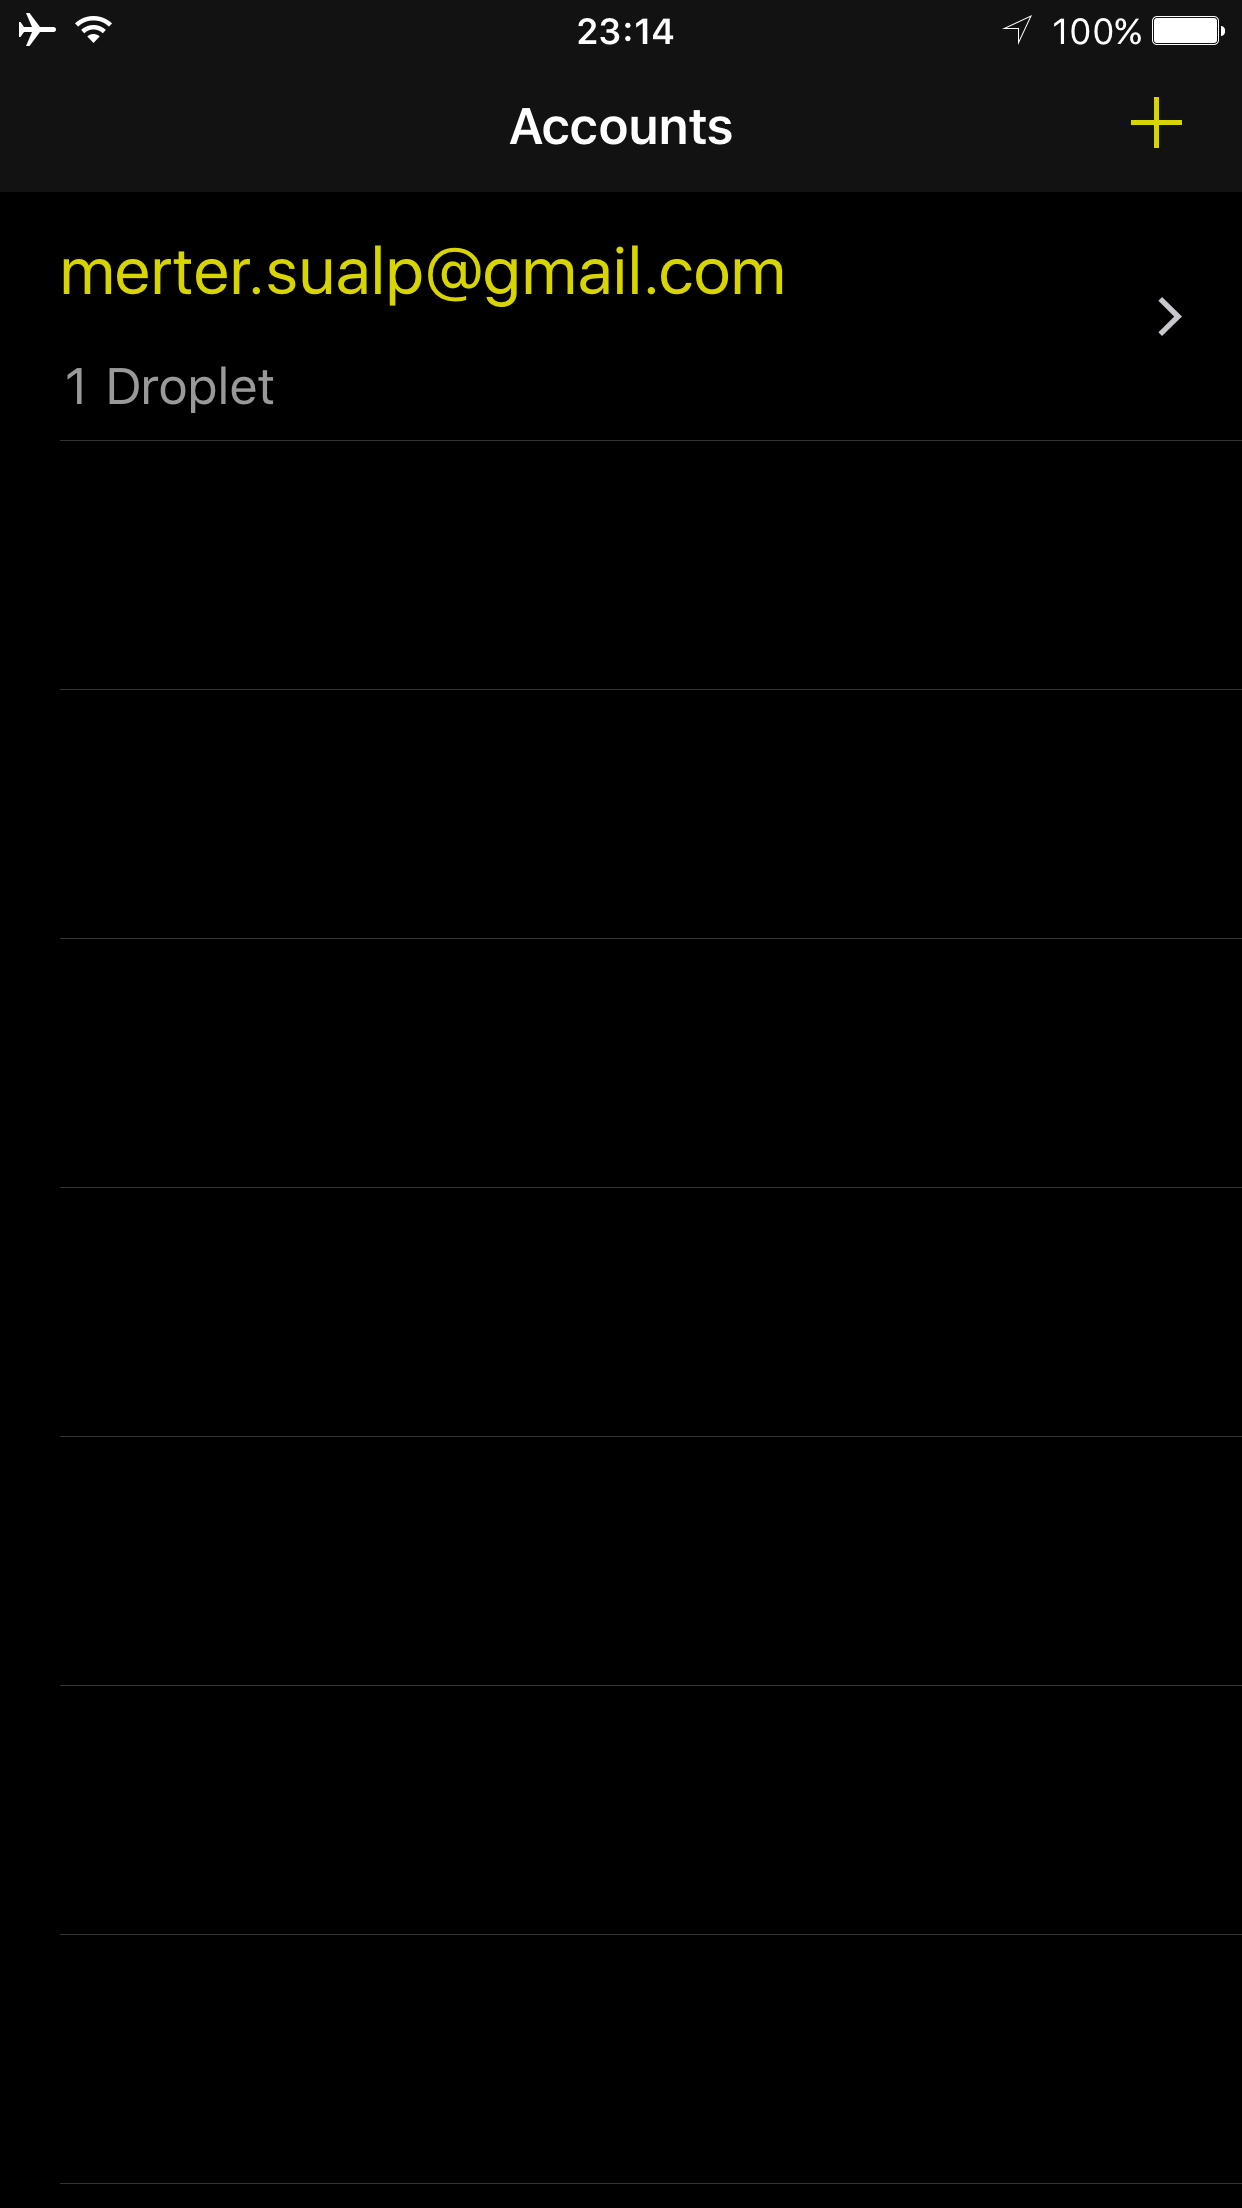
You can also power on/off or reboot them. There exists a “Droplet History” option but in iOS 10.0.2, it constantly crashes.

Droplet Operations

Unfortunately, you cannot add new droplets or delete / modify them. These two factors can be deal breakers for many users.

Droplet View

Its last update is done on May 5, 2015 and it costs $0.99. It offers no in app purchases.

DigitalOcean Toolbox

It is a universal app however, for some reason, in iOS 10.0.2, menu items do not appear on iPad.

No Menu Items

It supports split view and it also has an Apple Watch app. It uses only the OAuth2 API for logins. It does not support multiple accounts. You can only use one account at a specific time. The droplets are represented by small rectangles.

Droplet Rectangle

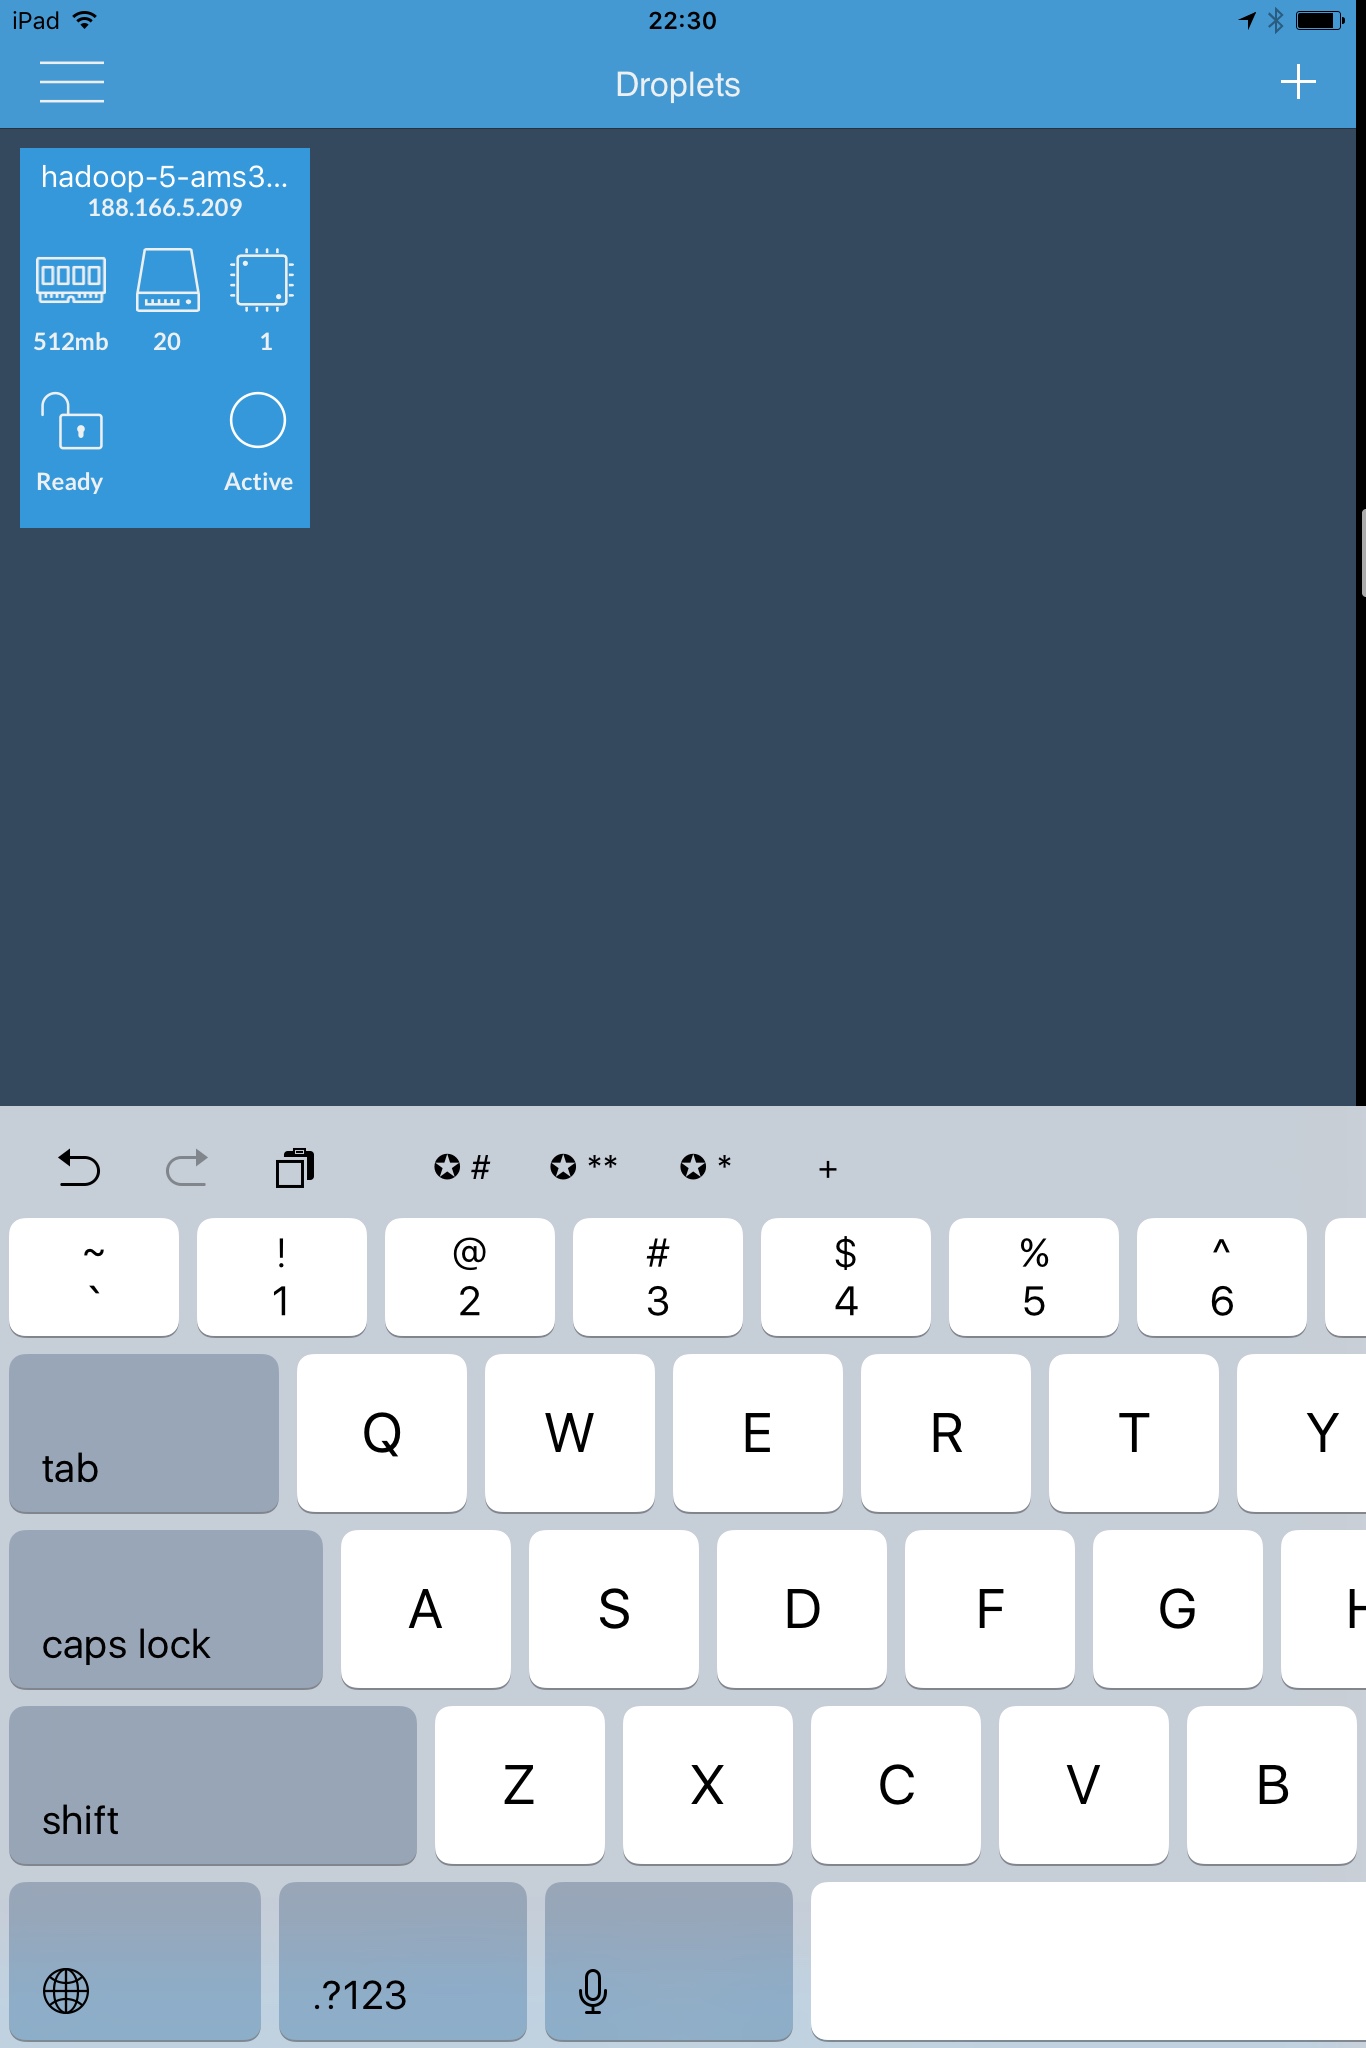
Inside, you can get necessary information about it. Moreover, when you press over a droplet and wait for a few seconds, 5 menu items appear as a quarter of a circle. They are power off, power cycle, take snapshot, disable backup and destroy. Every action selection presents a confirmation dialogue. That’s how I learnt all of them.

Droplet Actions

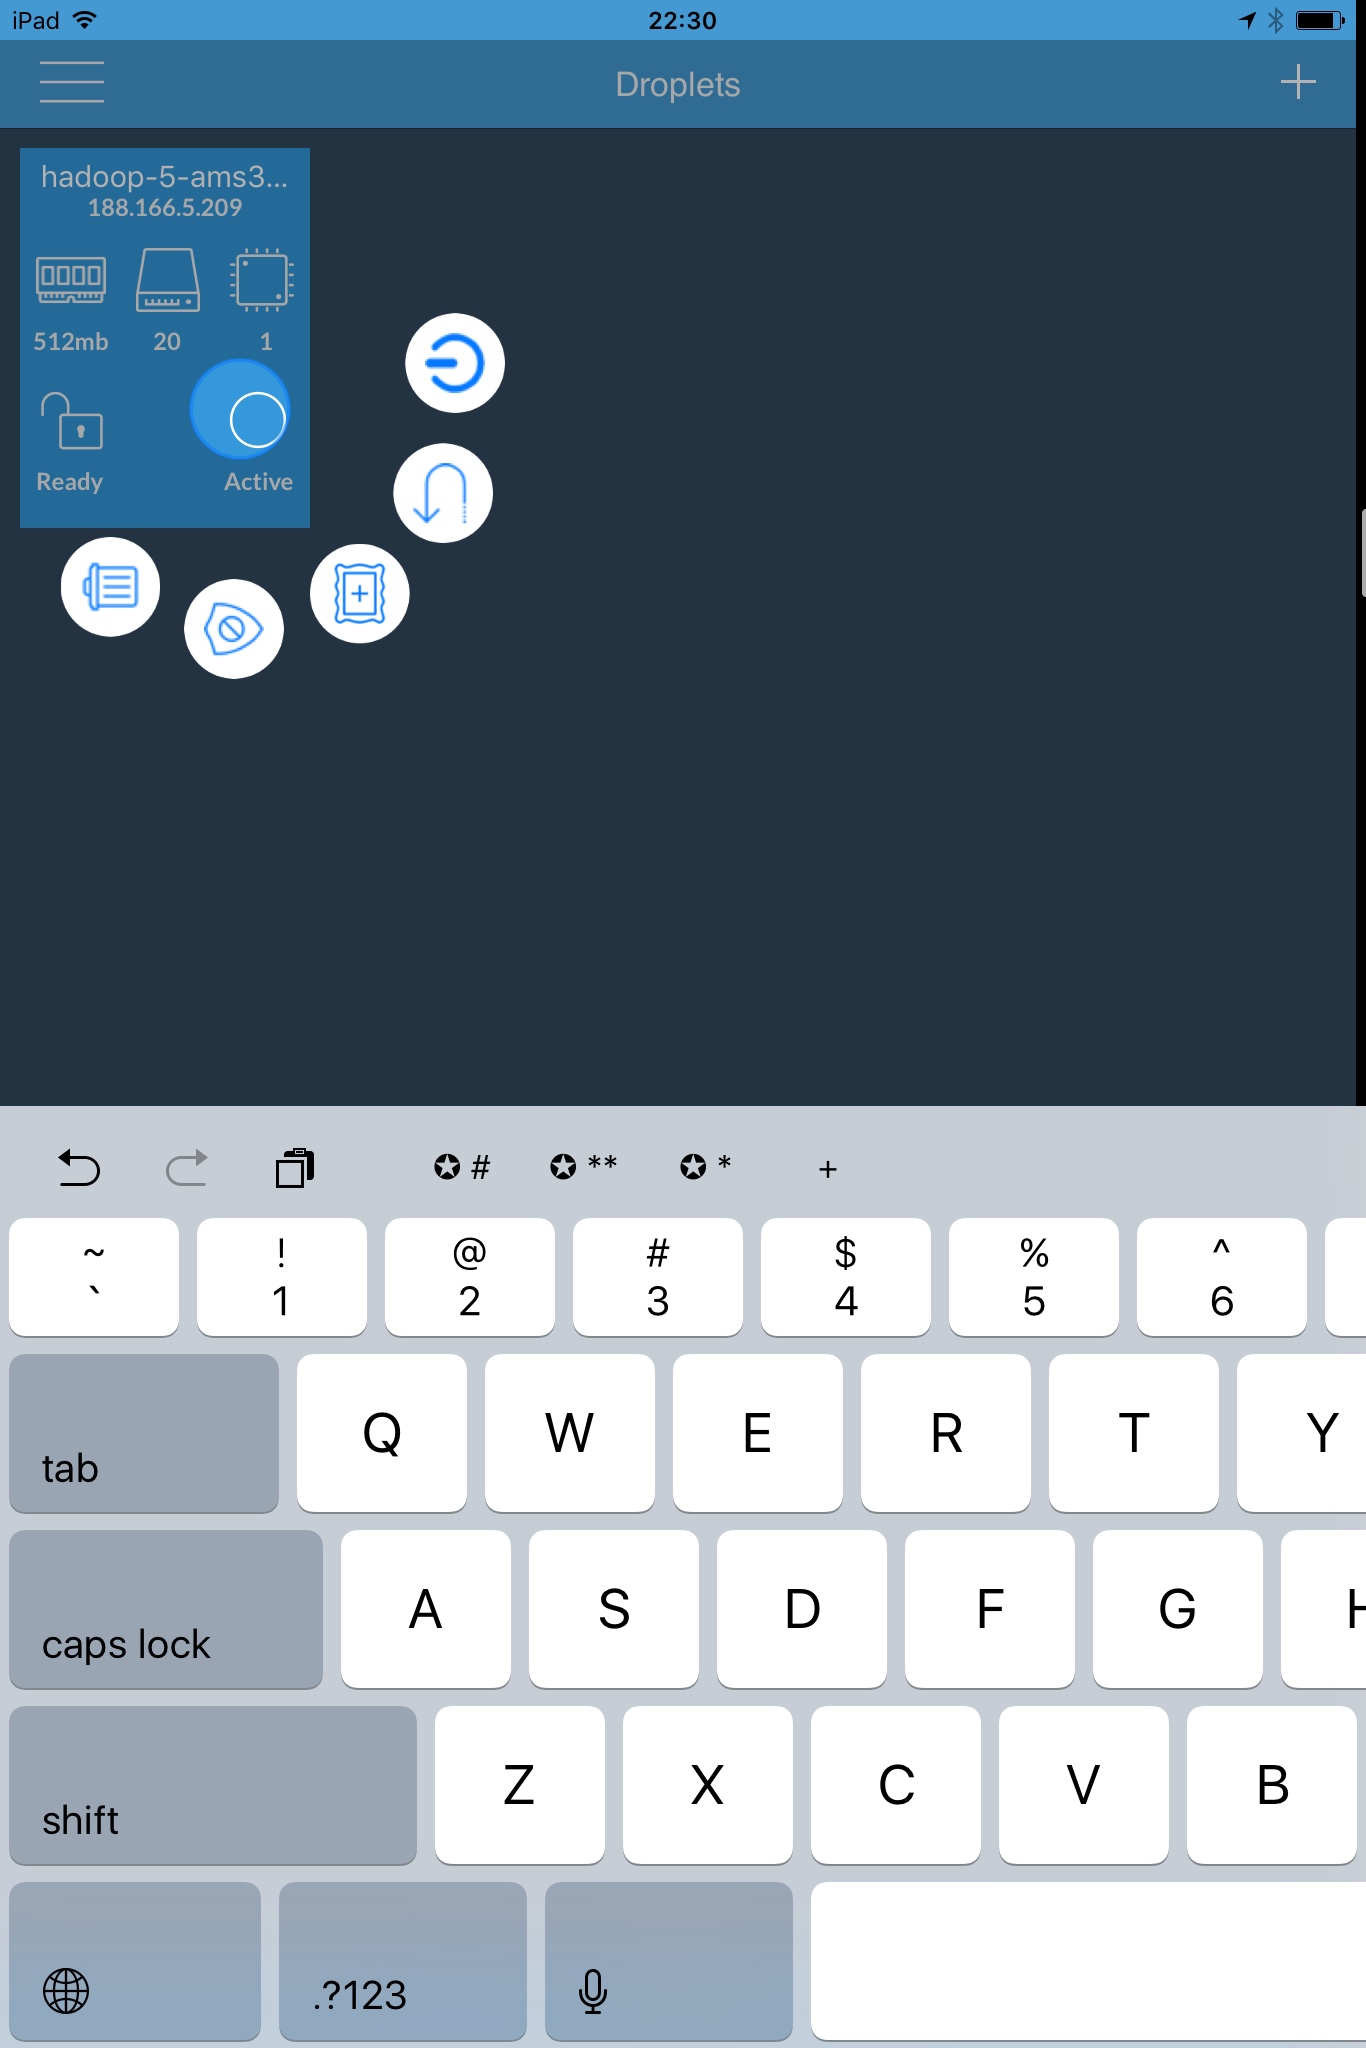
Since the touch point is the center, try to press to the right side of the droplets which appear on the left of the screen and press to the left side of the droplets which appear on the right of the screen. The actions are small circles and their functions are closely related to the icons but to activate them, you need to swipe your finger towards the action circle button. Unfortunately, the images of the actions are not appropriate for landscape orientation of iPad. It seems that a hard to use design choice was implemented.

Action Activation

Other than the droplet actions, you can also see the images. The images contain both the distribution images and your snapshots / backups. An interesting point is that, only a portion of distributed images is displayed. For example, we can merely see 3 distributions of Ubuntu, although there are more of them.

Also, while adding a droplet, we cannot choose every payment option. Only most affordable three option is available. Furthermore, we cannot create a droplet using our snapshots. Only distribution images can be used to create a brand new droplet.

Pricing Selection

Regarding images, we can transfer, rename or destroy a snapshot. Interestingly, the same set of operations are available for the distribution images. However, when we chose any of them, we get a message stating that these operations are forbidden for those images.

Image Operations

Its last update is done on February 13, 2016 and it costs $1.99. It offers no in app purchases.

DigitalOcean Manager

This is also a universal app but it does not support split view. Contrary to the previous apps, to logon to DigitalOcean Manager, we must provide our API key. There is no way to logon with our user names and passwords. This app does only enables one account at a time. The droplets are presented as a list.

Droplets

Touching the server row brings the Droplet information and actions menu. Moreover, the whole screen is occupied by a big map. It shows where your server is. To me, this is a waste of real estate. The available droplet actions are Reboot, Power Cycle, Shutdown, Power Off and Power On. You can also take a snapshot of your server in here.

Droplet Location

You can add droplets. The interface of droplet addition is quite simple and frankly not very attractive. The distribution images are quite limited and there is no option to create a droplet from your snapshots or backups. There is no way to destroy a droplet in this app.

Images

Its last update is done on May 14, 2015 and it costs $0.99. It offers no in app purchases.

Droopls

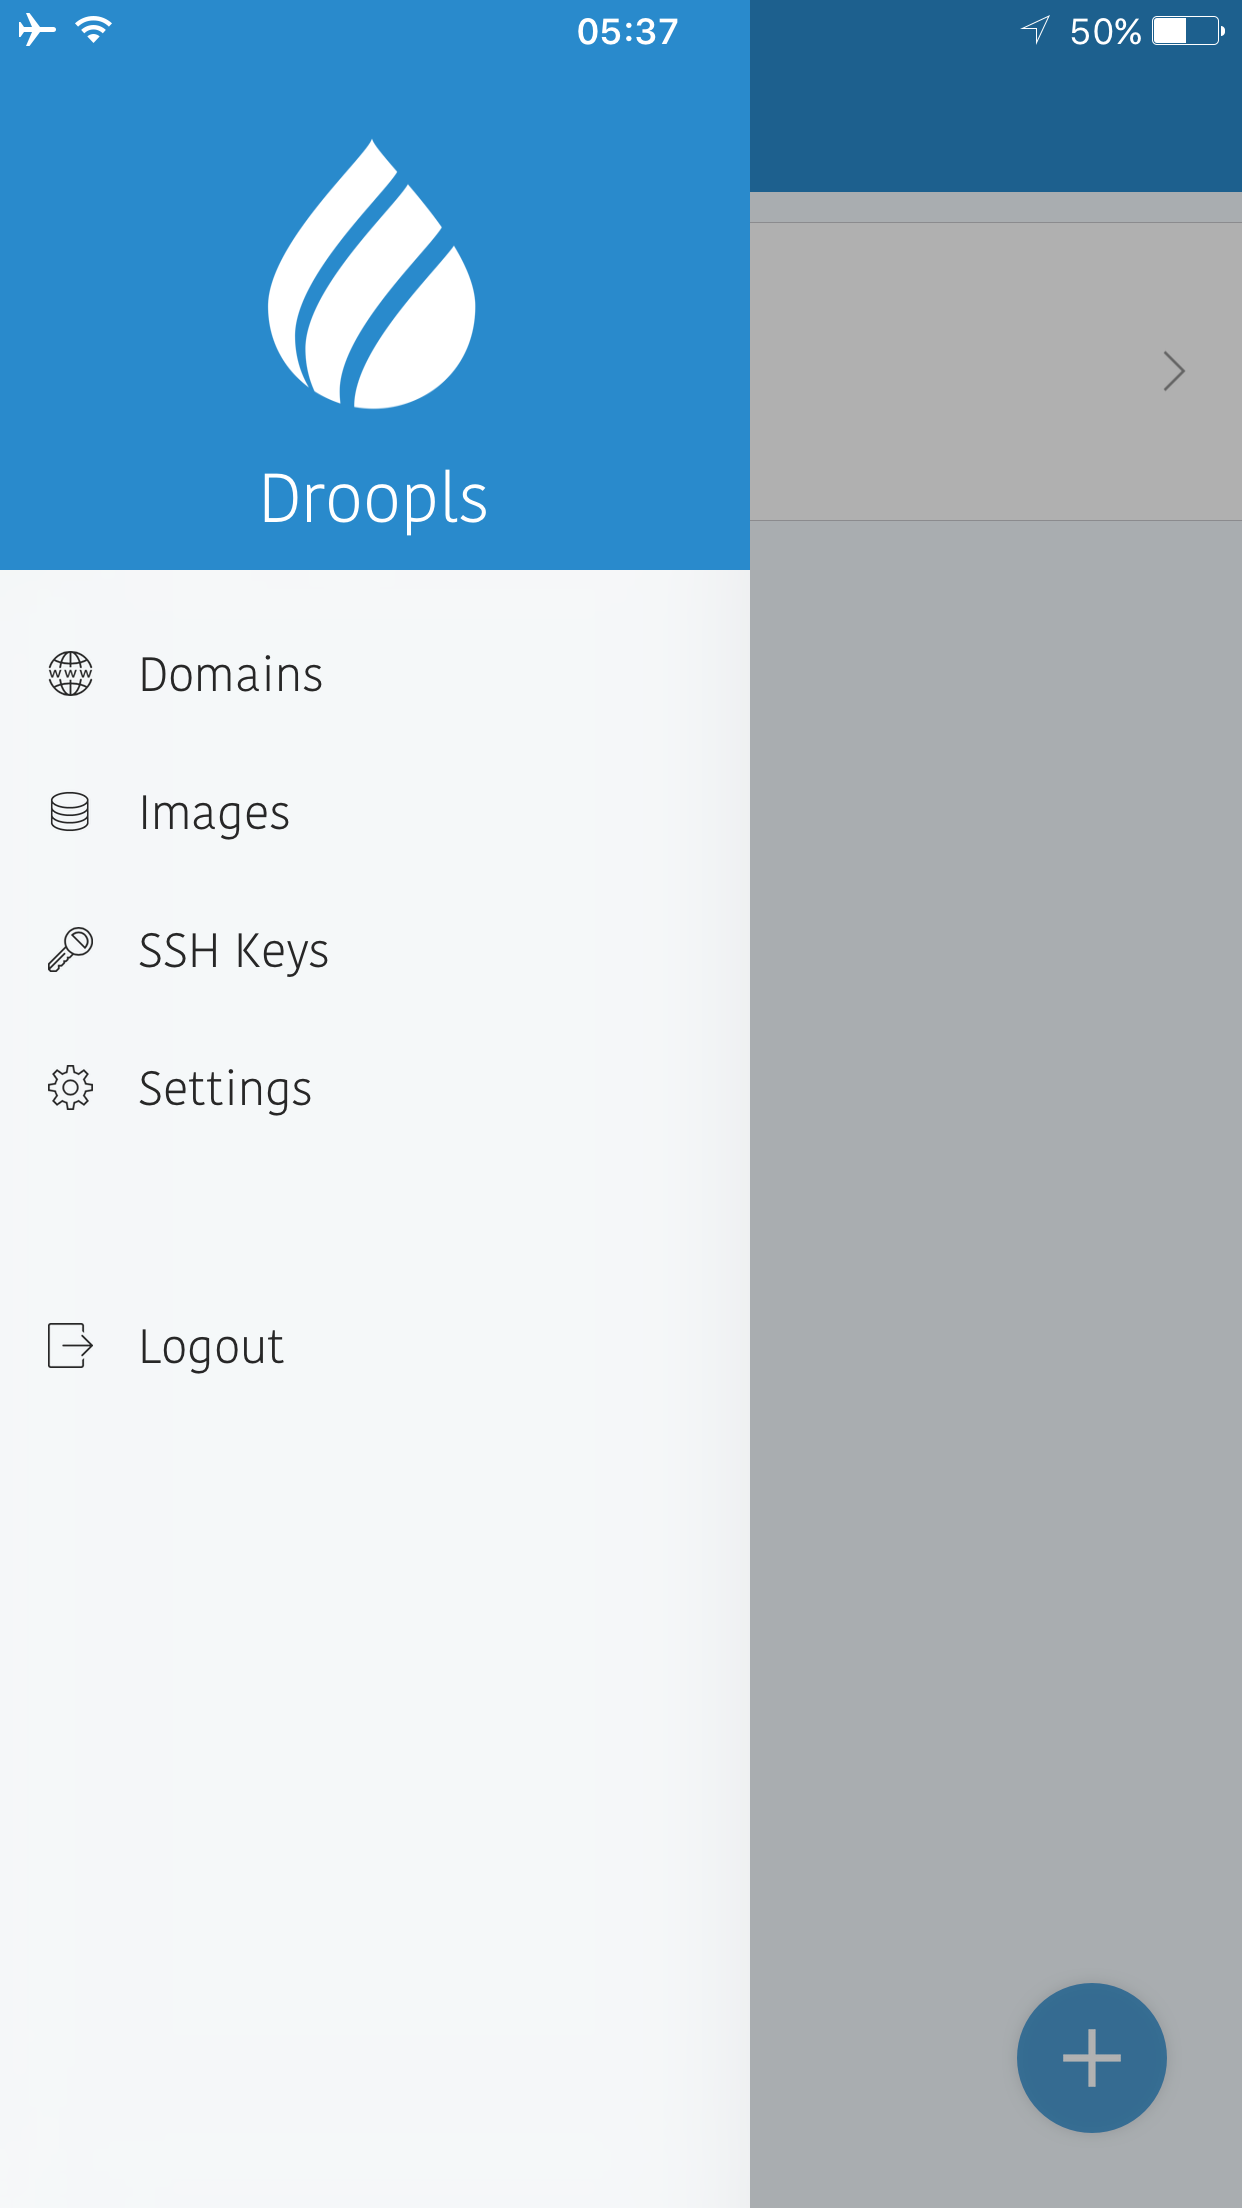
The Droopls app is iPhone only but it has by far the best UI. We can login to a single account, with password only. Default view is our droplets.

Default View

We can create new droplets. The creation process lists all sizes but the high memory configurations are not easily identifiable.

Droplet Creation
Pricing Tiers

As images, we can use all distributions, applications and also our snapshots and backups.

Image Options
Distributions
Applications

While creating the droplet, we can change private networking, IPv6 and automatic backup settings. These operations are also available after droplet creation. We can also generate an SSH key for that droplet.

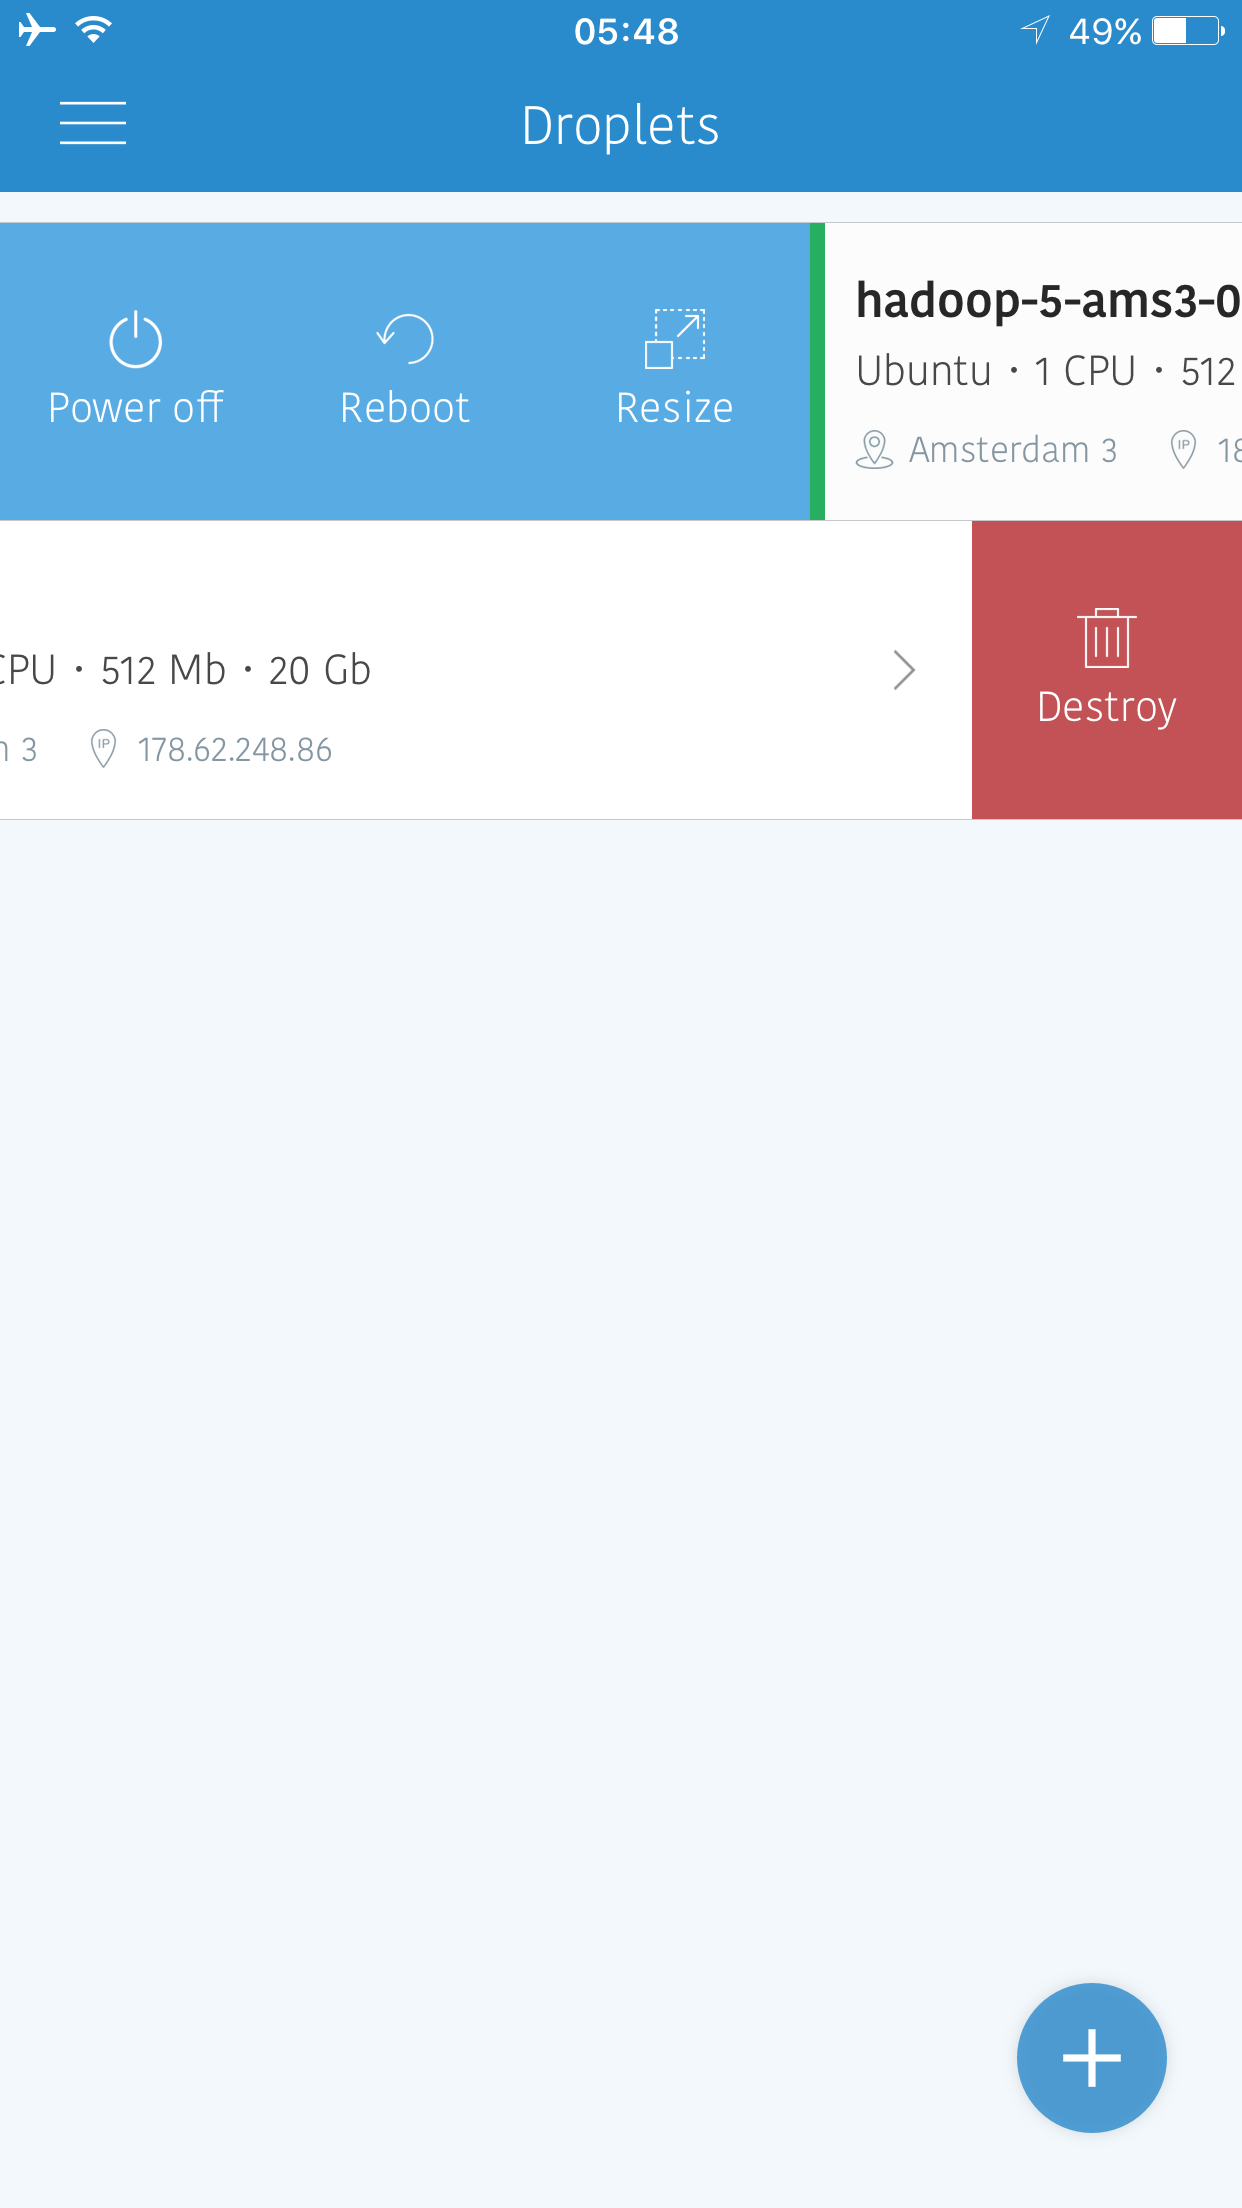
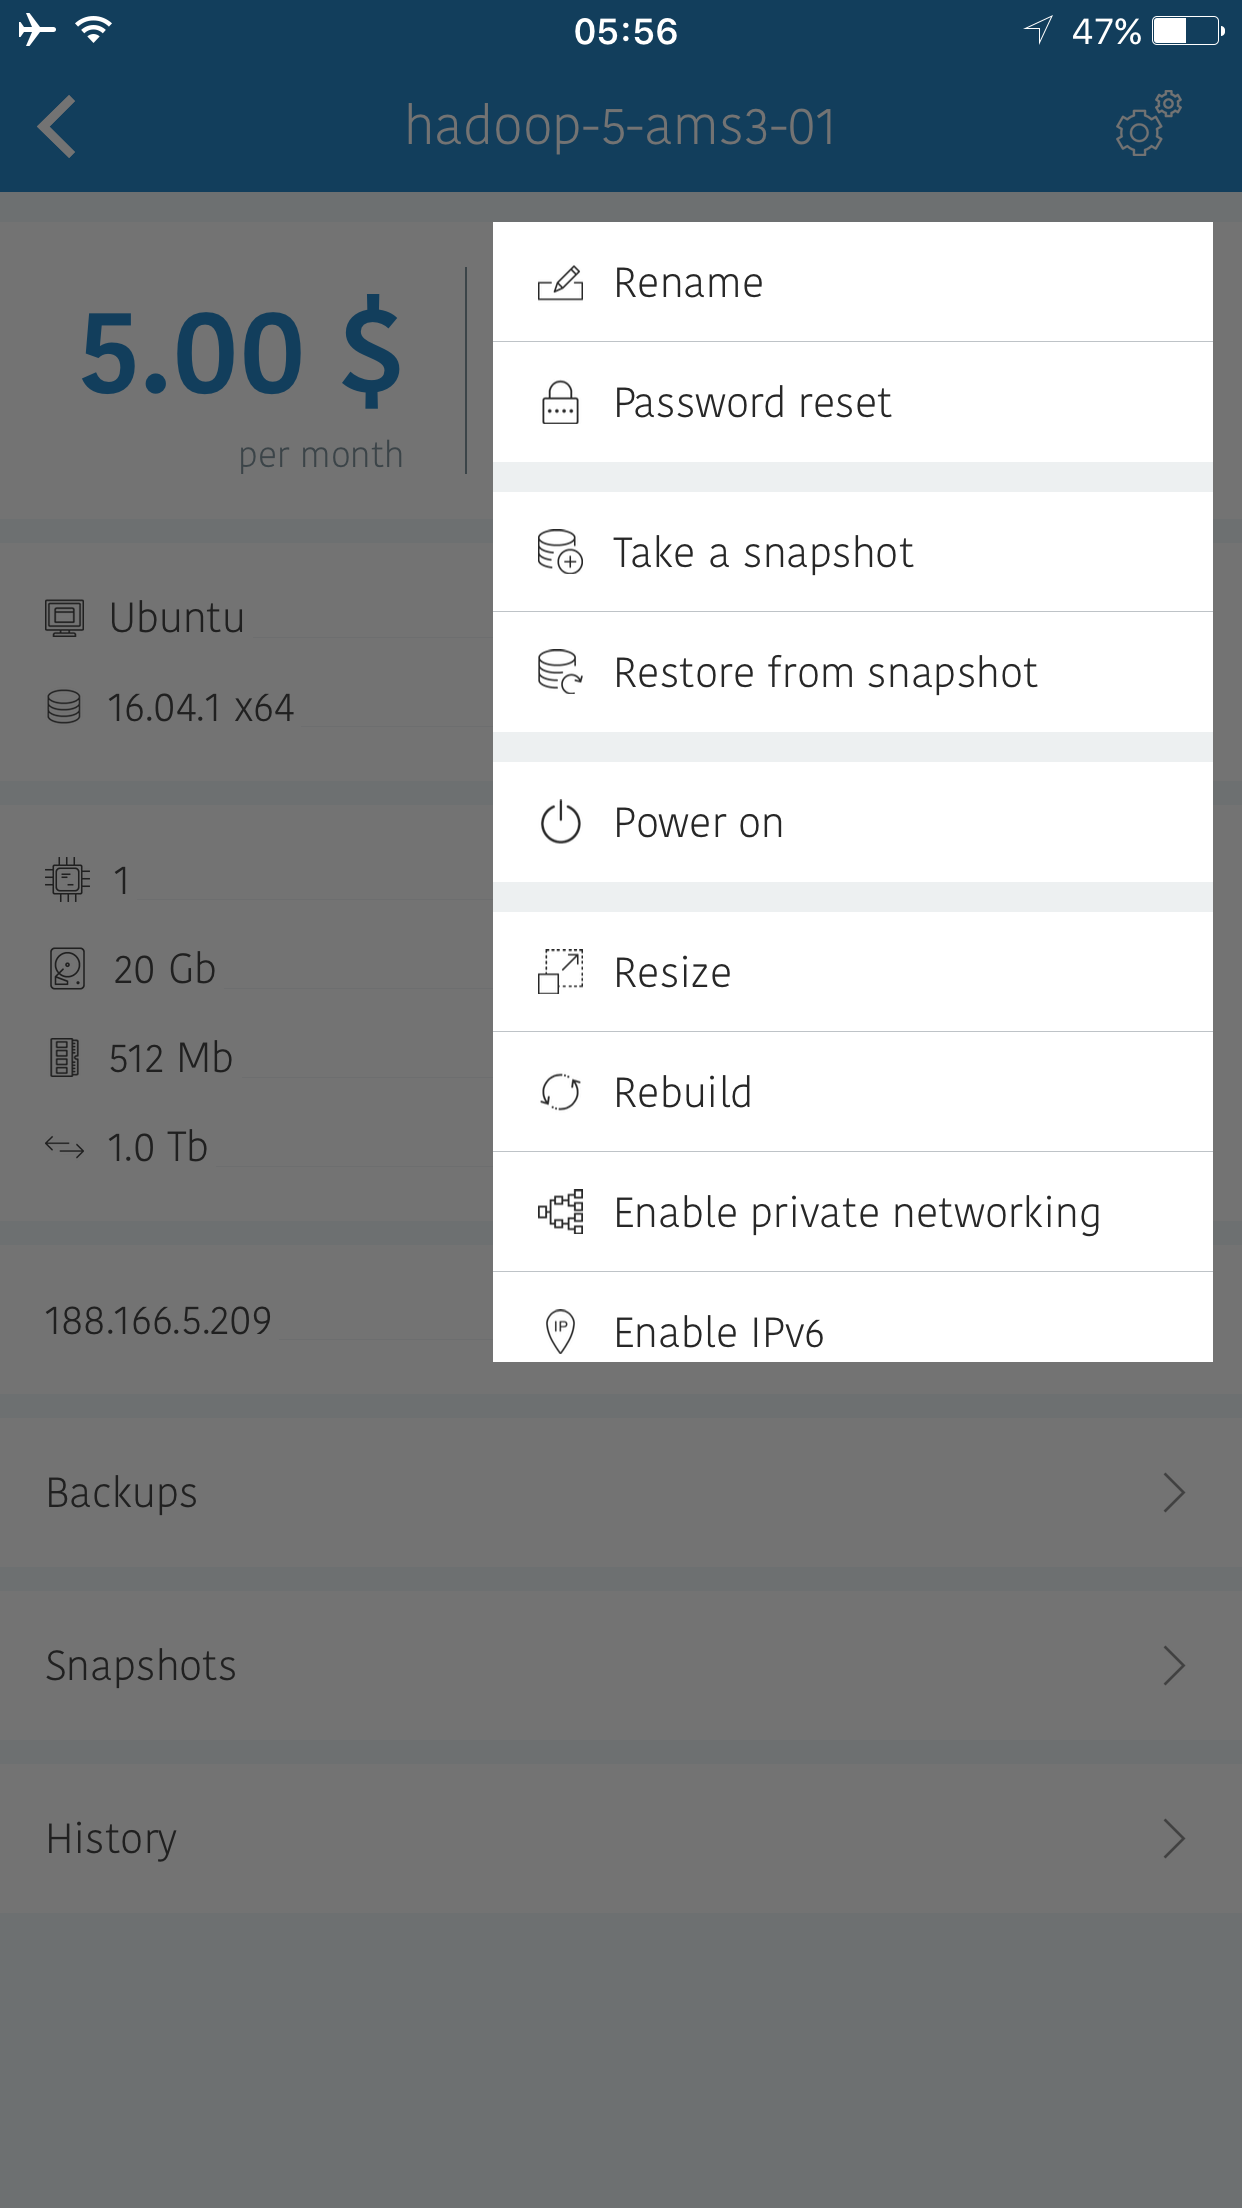
As droplet operations, we can rename, reset password, restore from snapshot, reboot, power off, power cycle and destroy the droplet.

Droplet Operations 1

Interestingly, we cannot resize the droplet from settings menu. Rather, we need to get to the list of droplets and make a right swipe to reveal that option.

Droplet operations 2

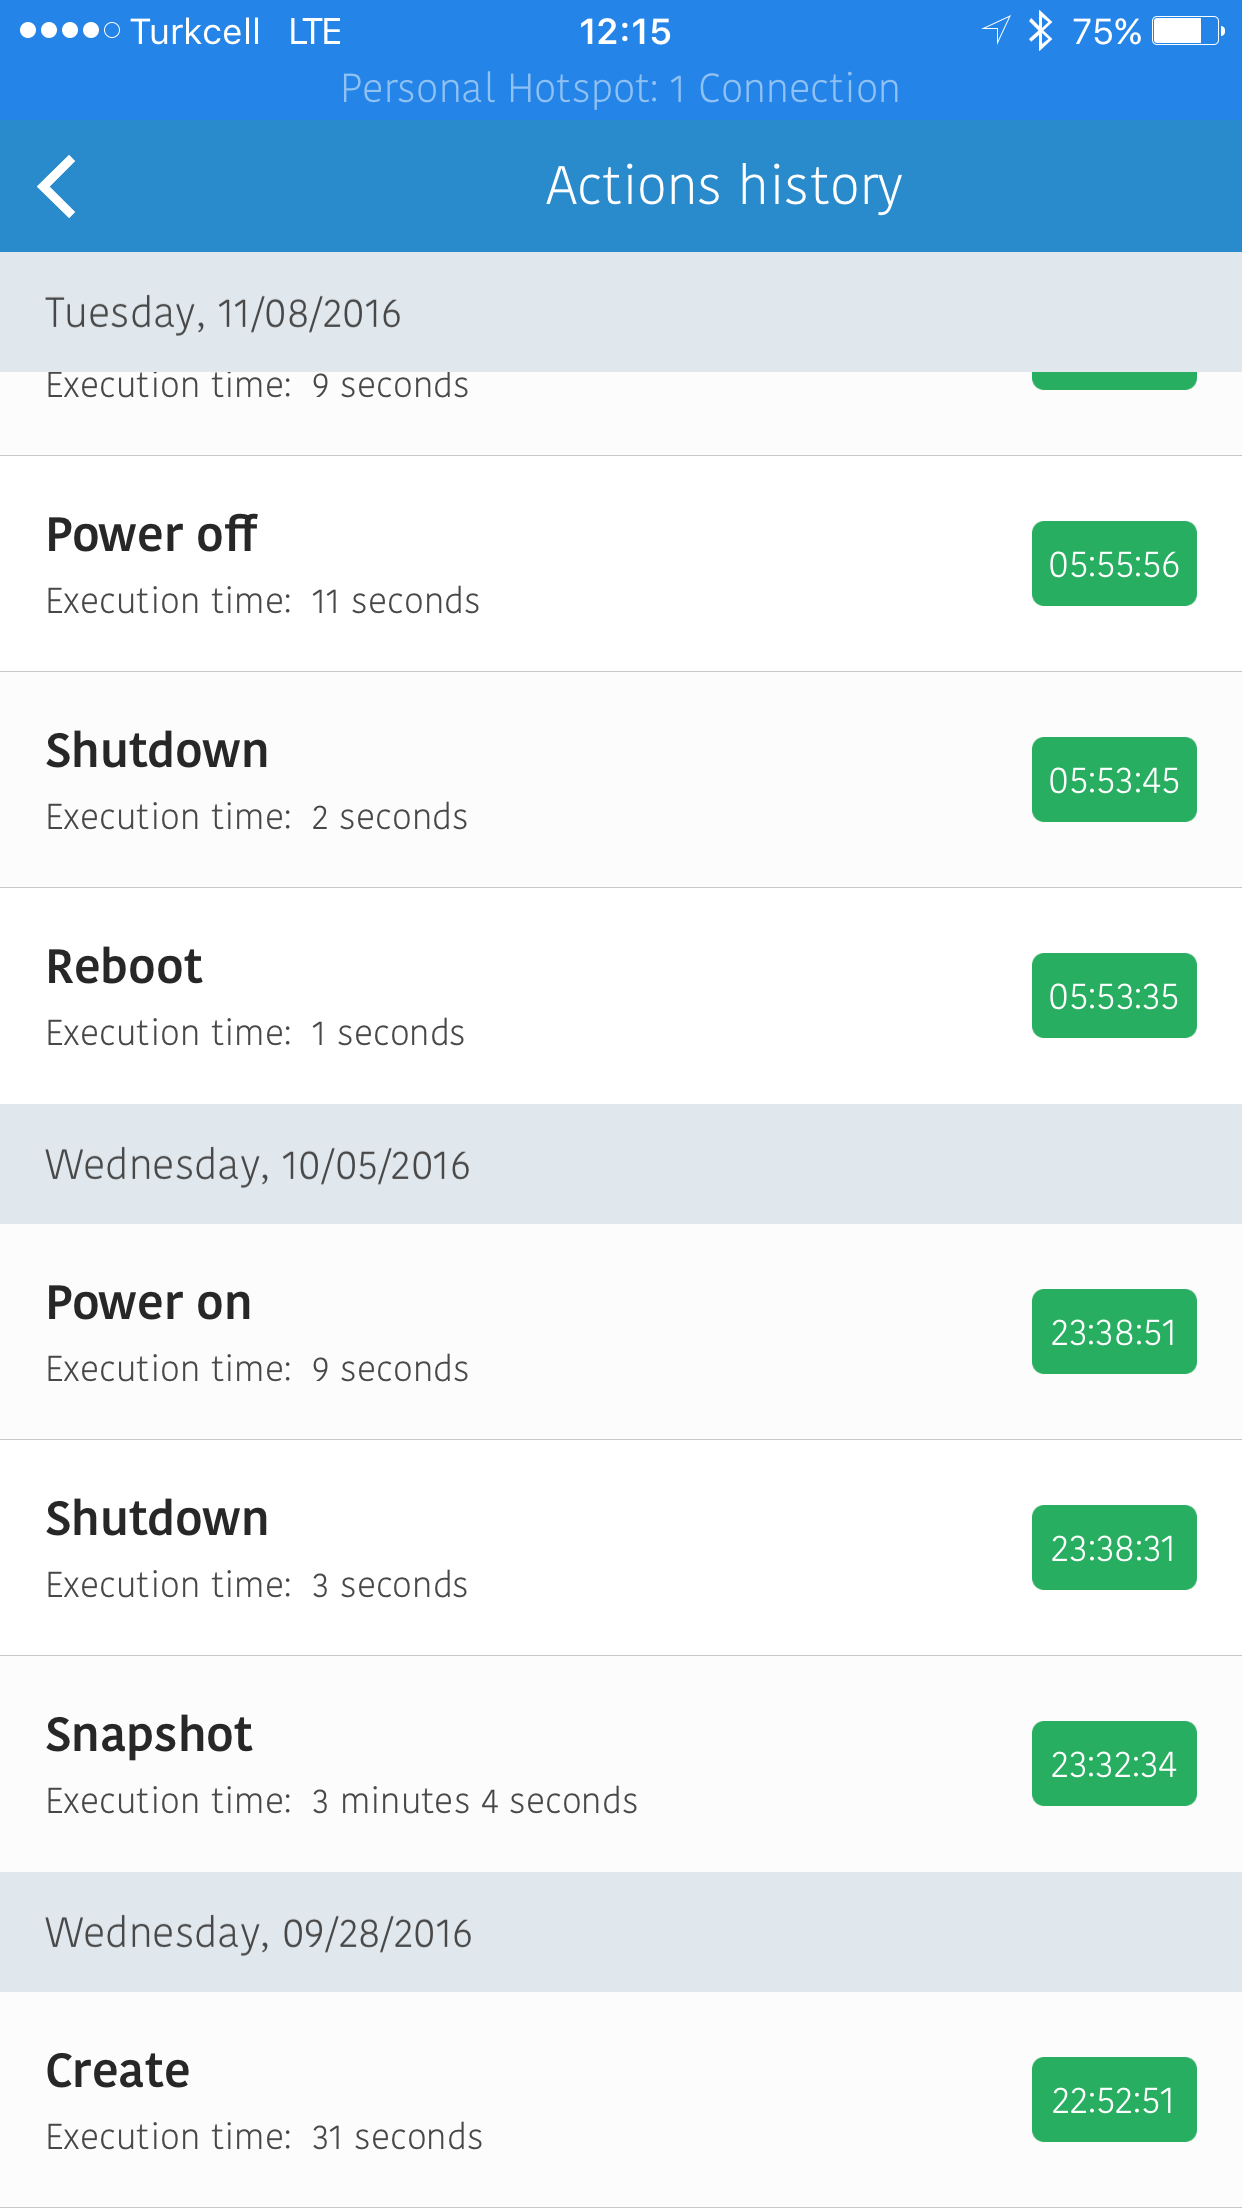
The history of each droplet can be seen in a descending order of time fashion.

History

To take a snapshot of a droplet, we first need to shutdown the droplet. The menu is updated after the shutdown. Later, we can take the snapshot.

Menu is updated
Take the Snapshot

We can create domains and see snapshots. For snapshots, we have the ability to transfer, rename and delete them. As a last set of operations, we can add SSH keys.

Menu
Image Operations

It is the most pricey app in the bunch, requiring a one time purchase of $4.99. It has no in app purchase option and updated on December 3, 2015. For the time being, it is “the app” to use for DigitalOcean. Period.

MagicOcean

It writes “Login Button”. Why there is “button”? I do not know. It directly takes you to the login web page of DigitalOcean. Although it is the most recently updated app, It does not work after login! I tested it with 10.1 and 10.1.1
August 22, 2016

Manager for DigitalOcean

This iPhone only app gives us the option both to login with our account or to authenticate with token. We can also add more than one account and select it to see the activities and droplets under it. These can be found in the Settings menu.

Multiple Accounts

The droplet creations, power actions for droplets and account removal can be modified to require confirmation. Deletion of droplets, snapshots and keys always requires confirmation. We can also change the color of the app in the settings menu.

Settings

We can see all our droplets and create new ones.

Droplets

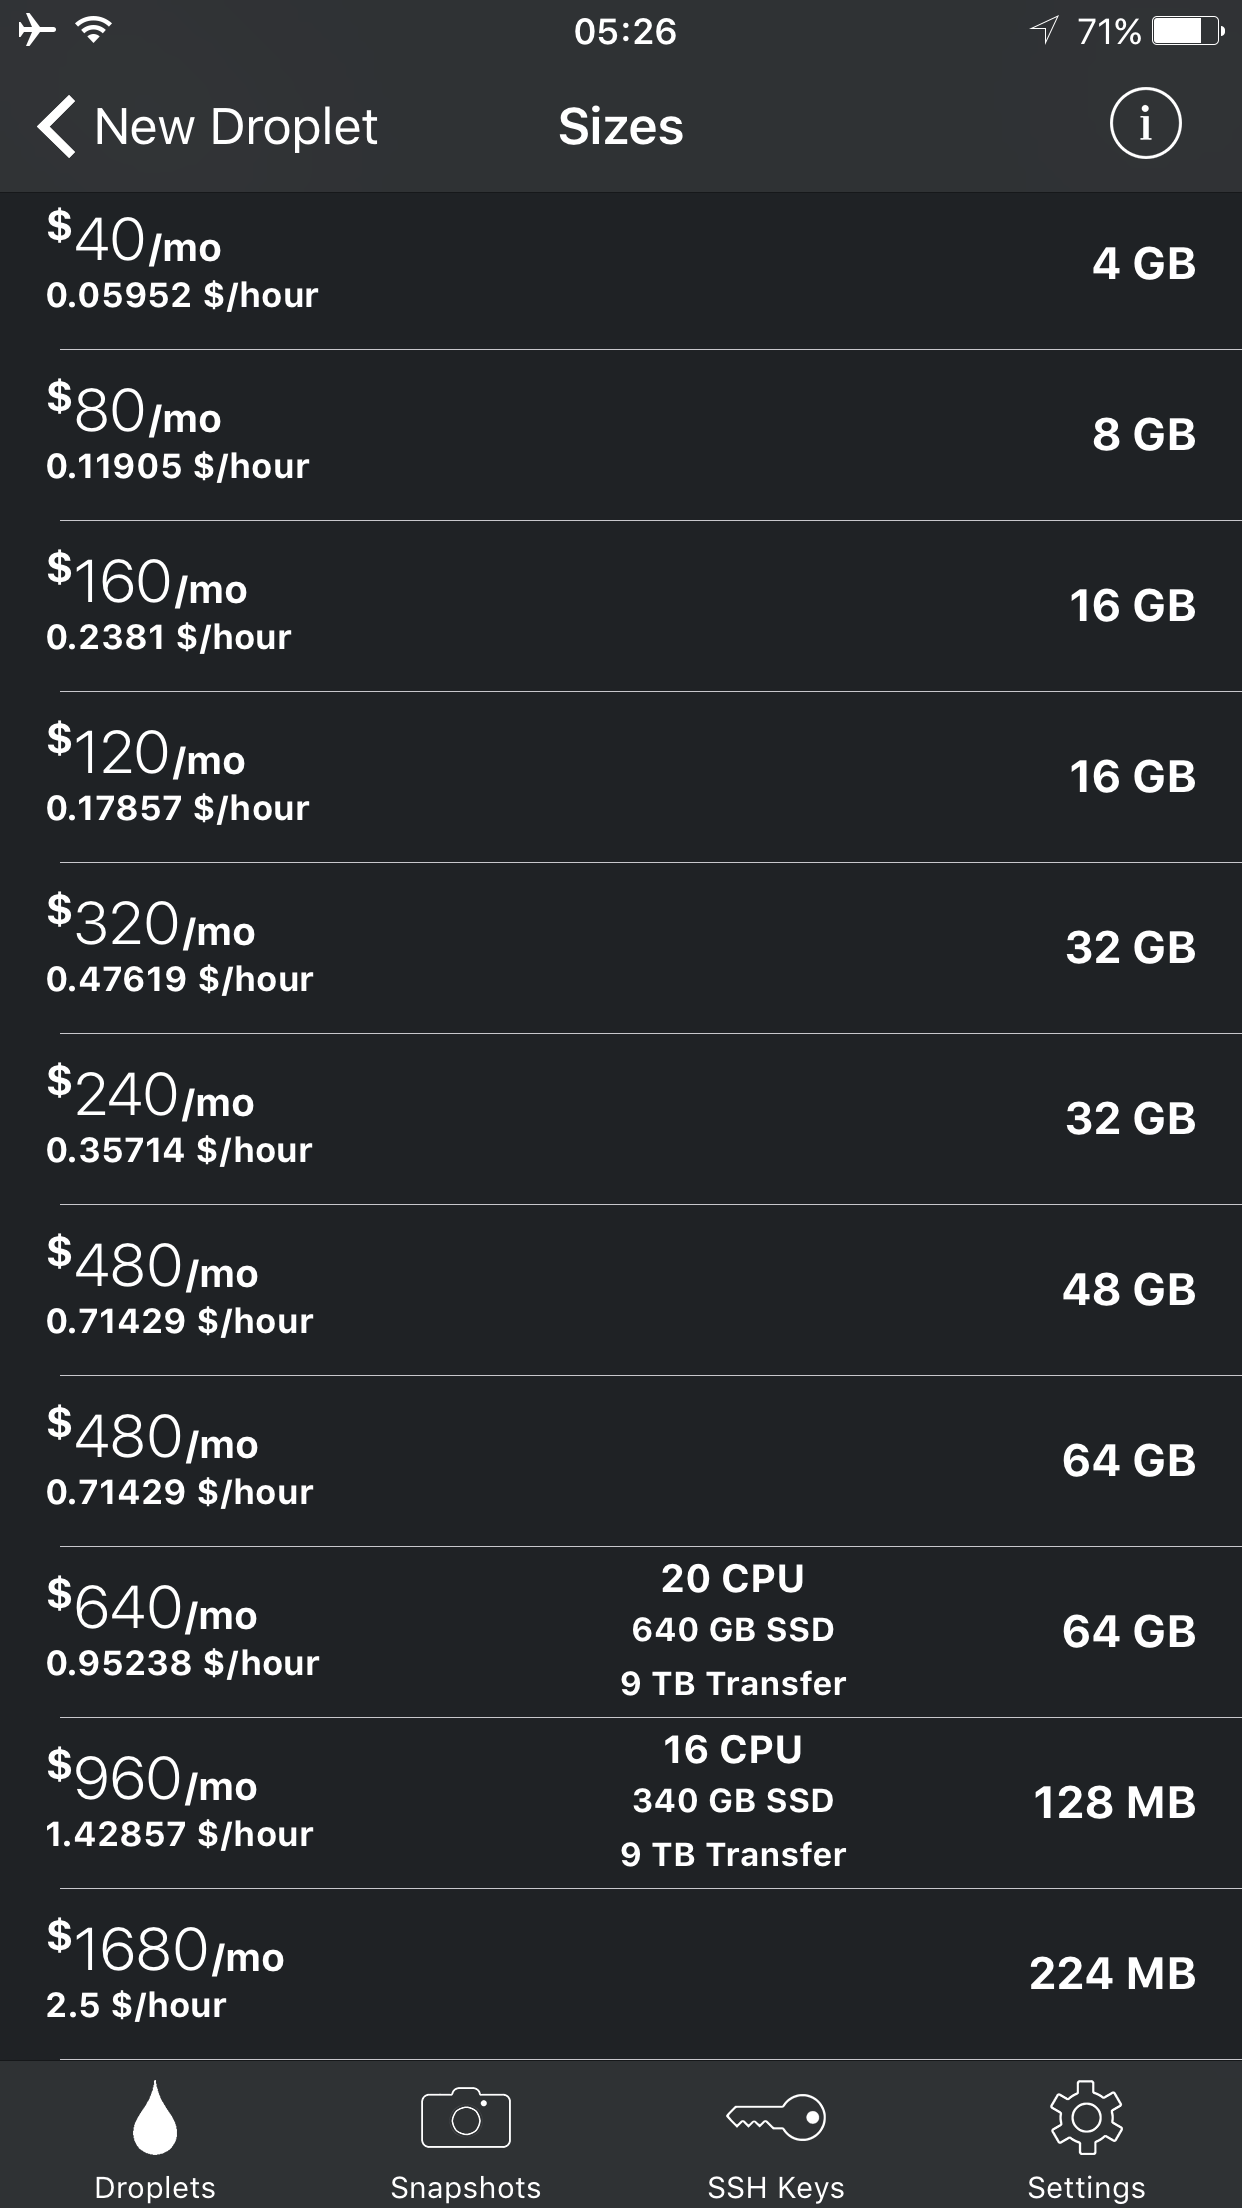
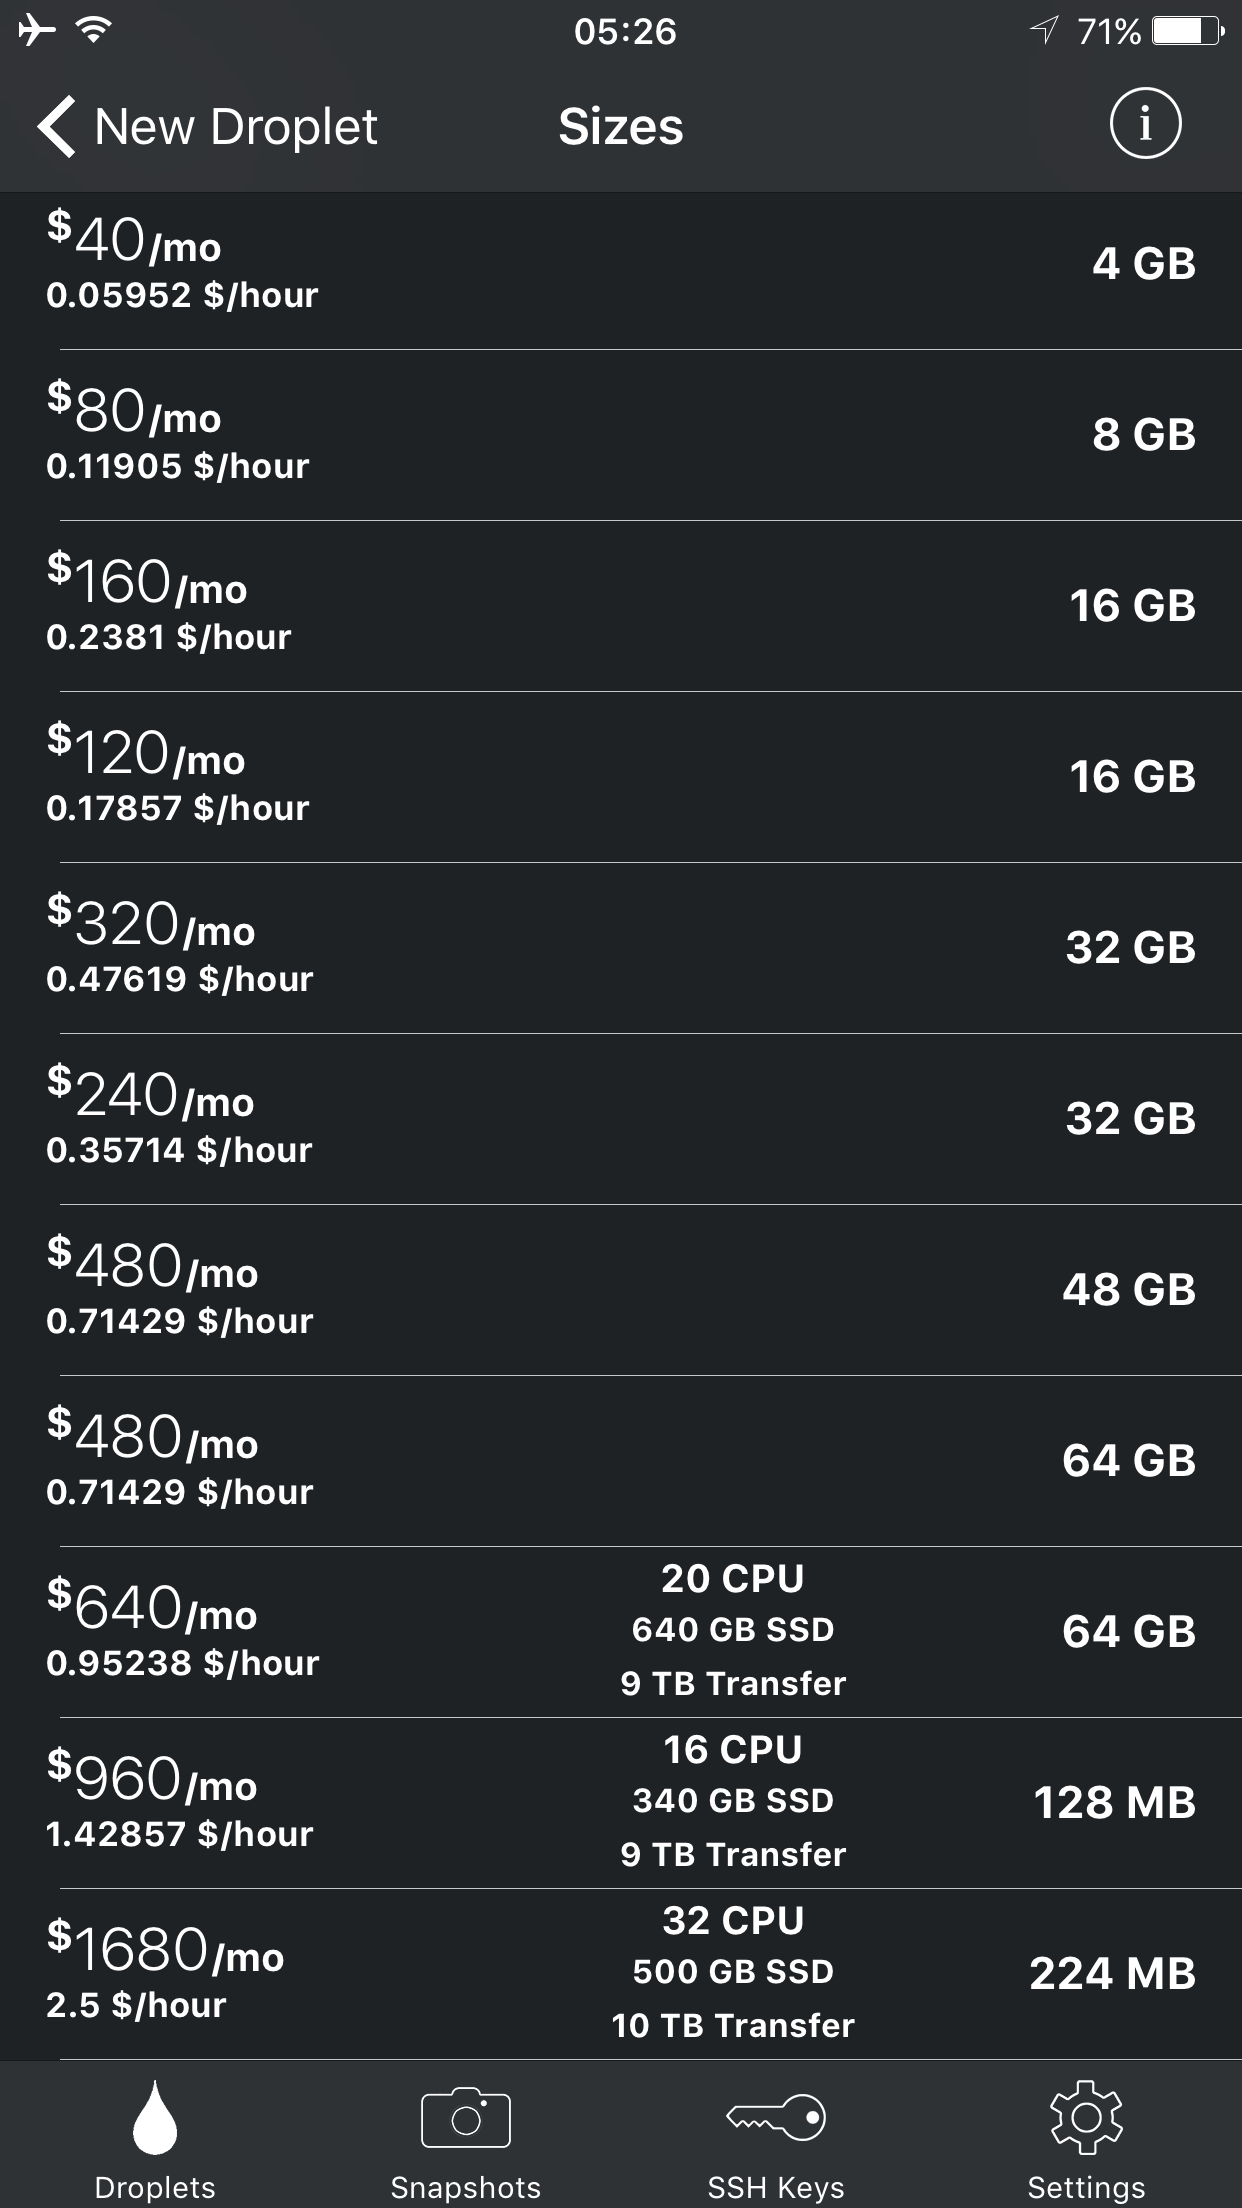
During a new creation, size selection can be a little bit confusing. The tiers are ordered by RAM but it would really be nice if high memory droplet pricing was represented differently from the regular ones.

Pricing Tiers

The information button on the top right shows the CPU, storage and network transfers. There seems to be a problem with loading the rows, since even you tap the info button once more and close the details, some previously unseen rows still show their respective details.

Row Problem 1
Row Problem 2

We have the option to choose from distributions, applications and our snapshots as the base image for a new droplet.

Distributions
Applications
Snapshots

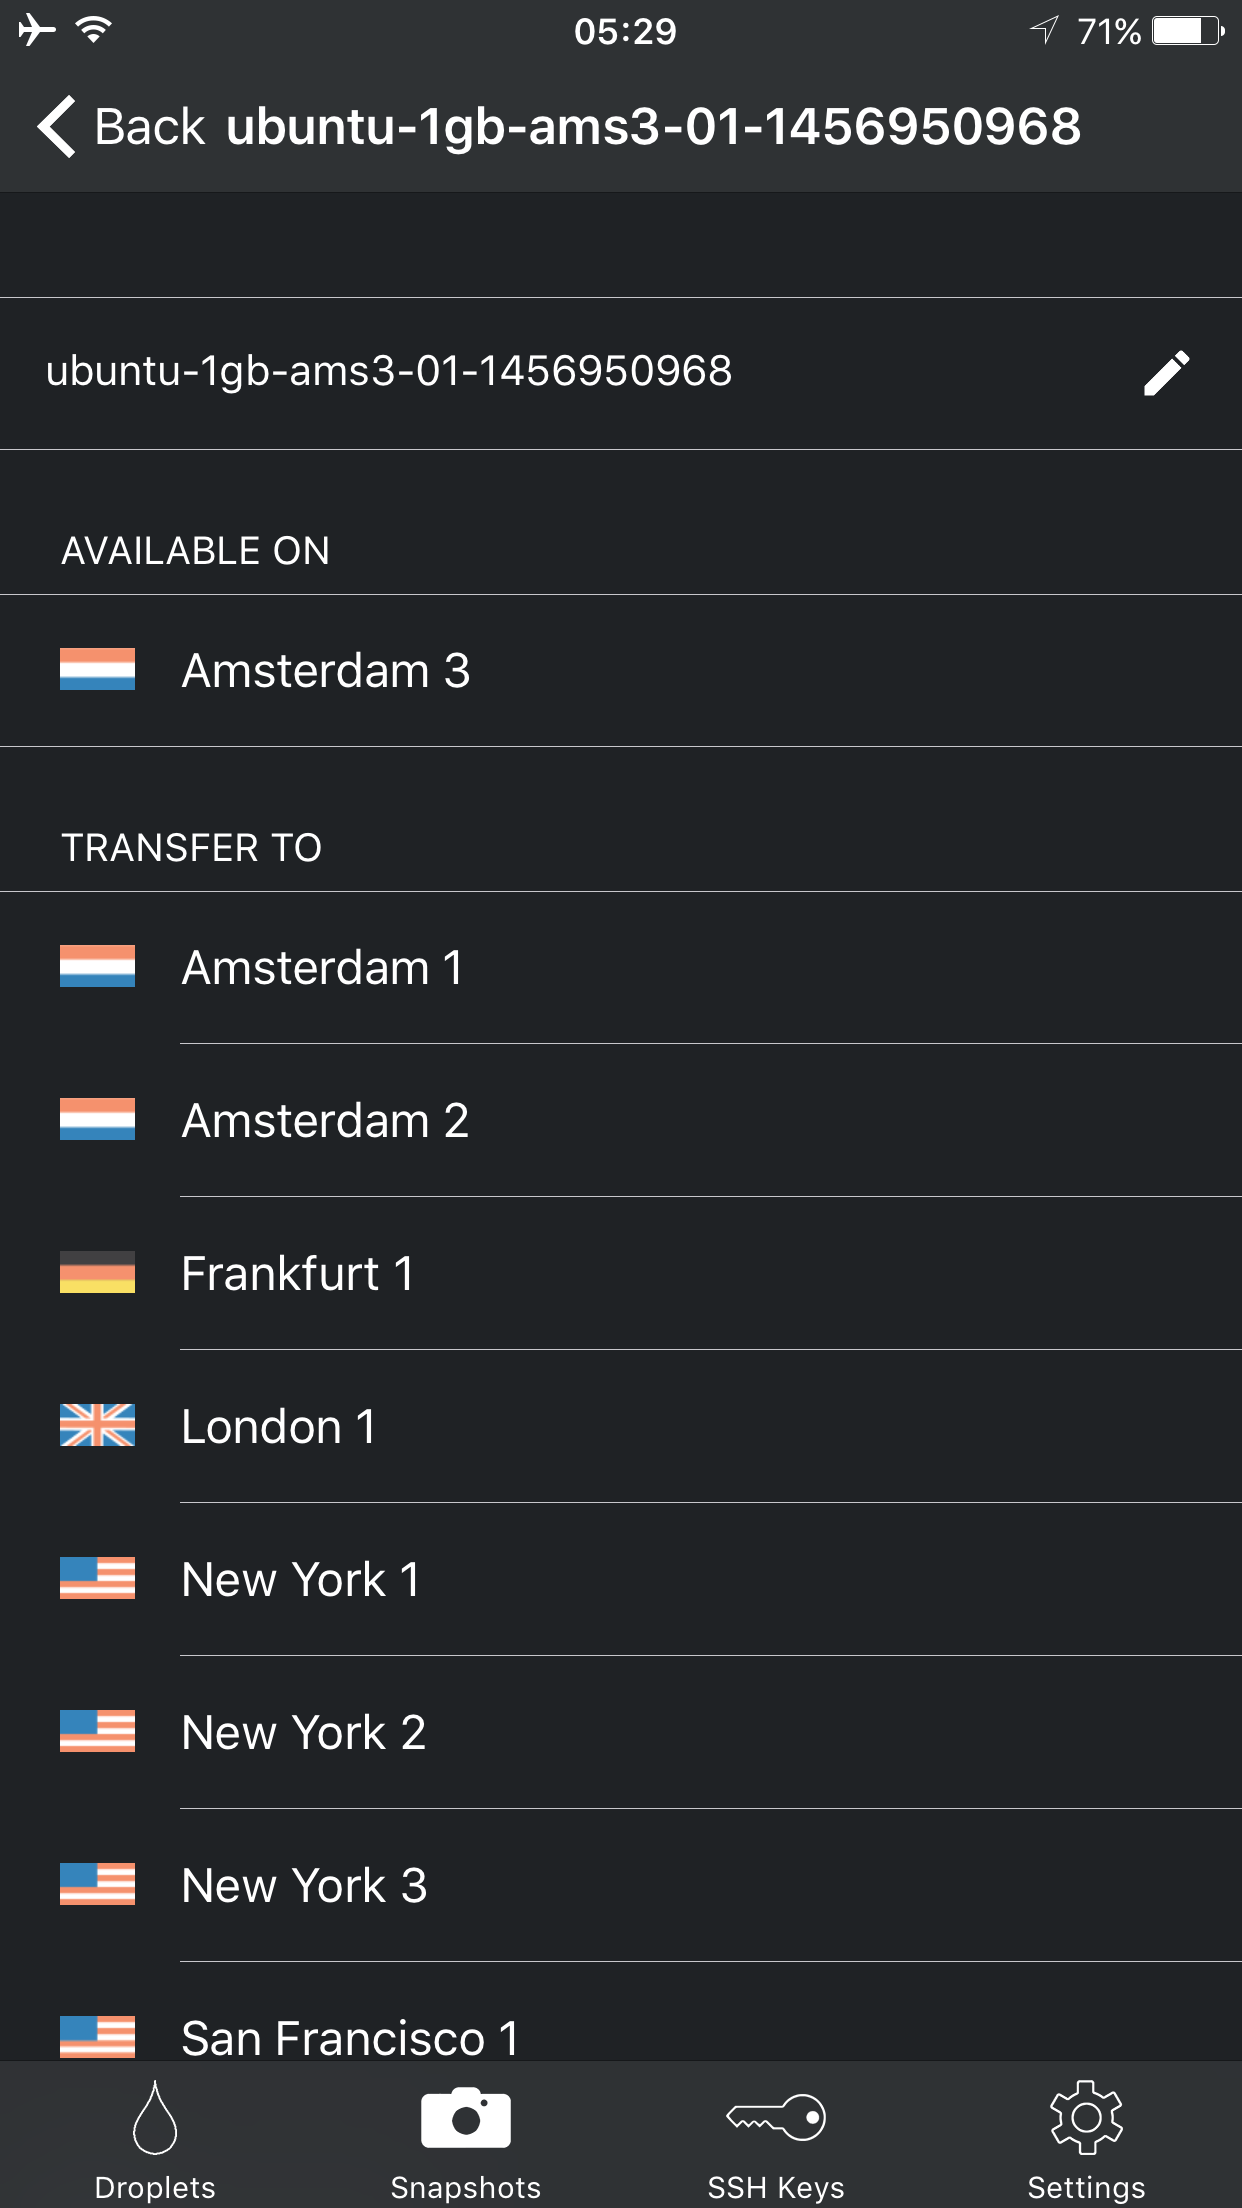
Since we can use snapshots, transferring them from one place to another can be crucial. Manager for DigitalOcean has this nice movement feature. We can also generate SSH keys.

Transfer

The droplets can be rebooted, shutdown.

Power Actions

We can take the snapshots of them. Even we can rebuild them. Destroying a droplet is also available.

Droplet Actions

A nice touch was easily copying the network information by a single tap. This is really handy if you use those in other apps such as Prompt 2.

Simple Copy

The nice thing with the UI is that, there is no left/right swipes to see the available actions or options. Everything is clearly presented inside each view.

Its first and only deployment came on December 13, 2015. It is free and there is no in app purchases.

Snapper for Digital Ocean

This universal app is free but with ads on the very bottom. To remove them, you need to make an in app purchase of $0.99. Since it has been quite a while from its last update, its visuals are a little bit muddy in iPhone Plus and iPad Pro 12.9 models. It does not support split view. To login, you are directed to the Digital Ocean website. You cannot use API keys to login and multi account usage is impossible.

Droplets

The main menu permits us to see a list of our droplets, domains and SSH keys. We can add domains, SSH keys but not droplets.The droplet information is quite limited. For example, we cannot get storage information for our droplets.

Droplet Information

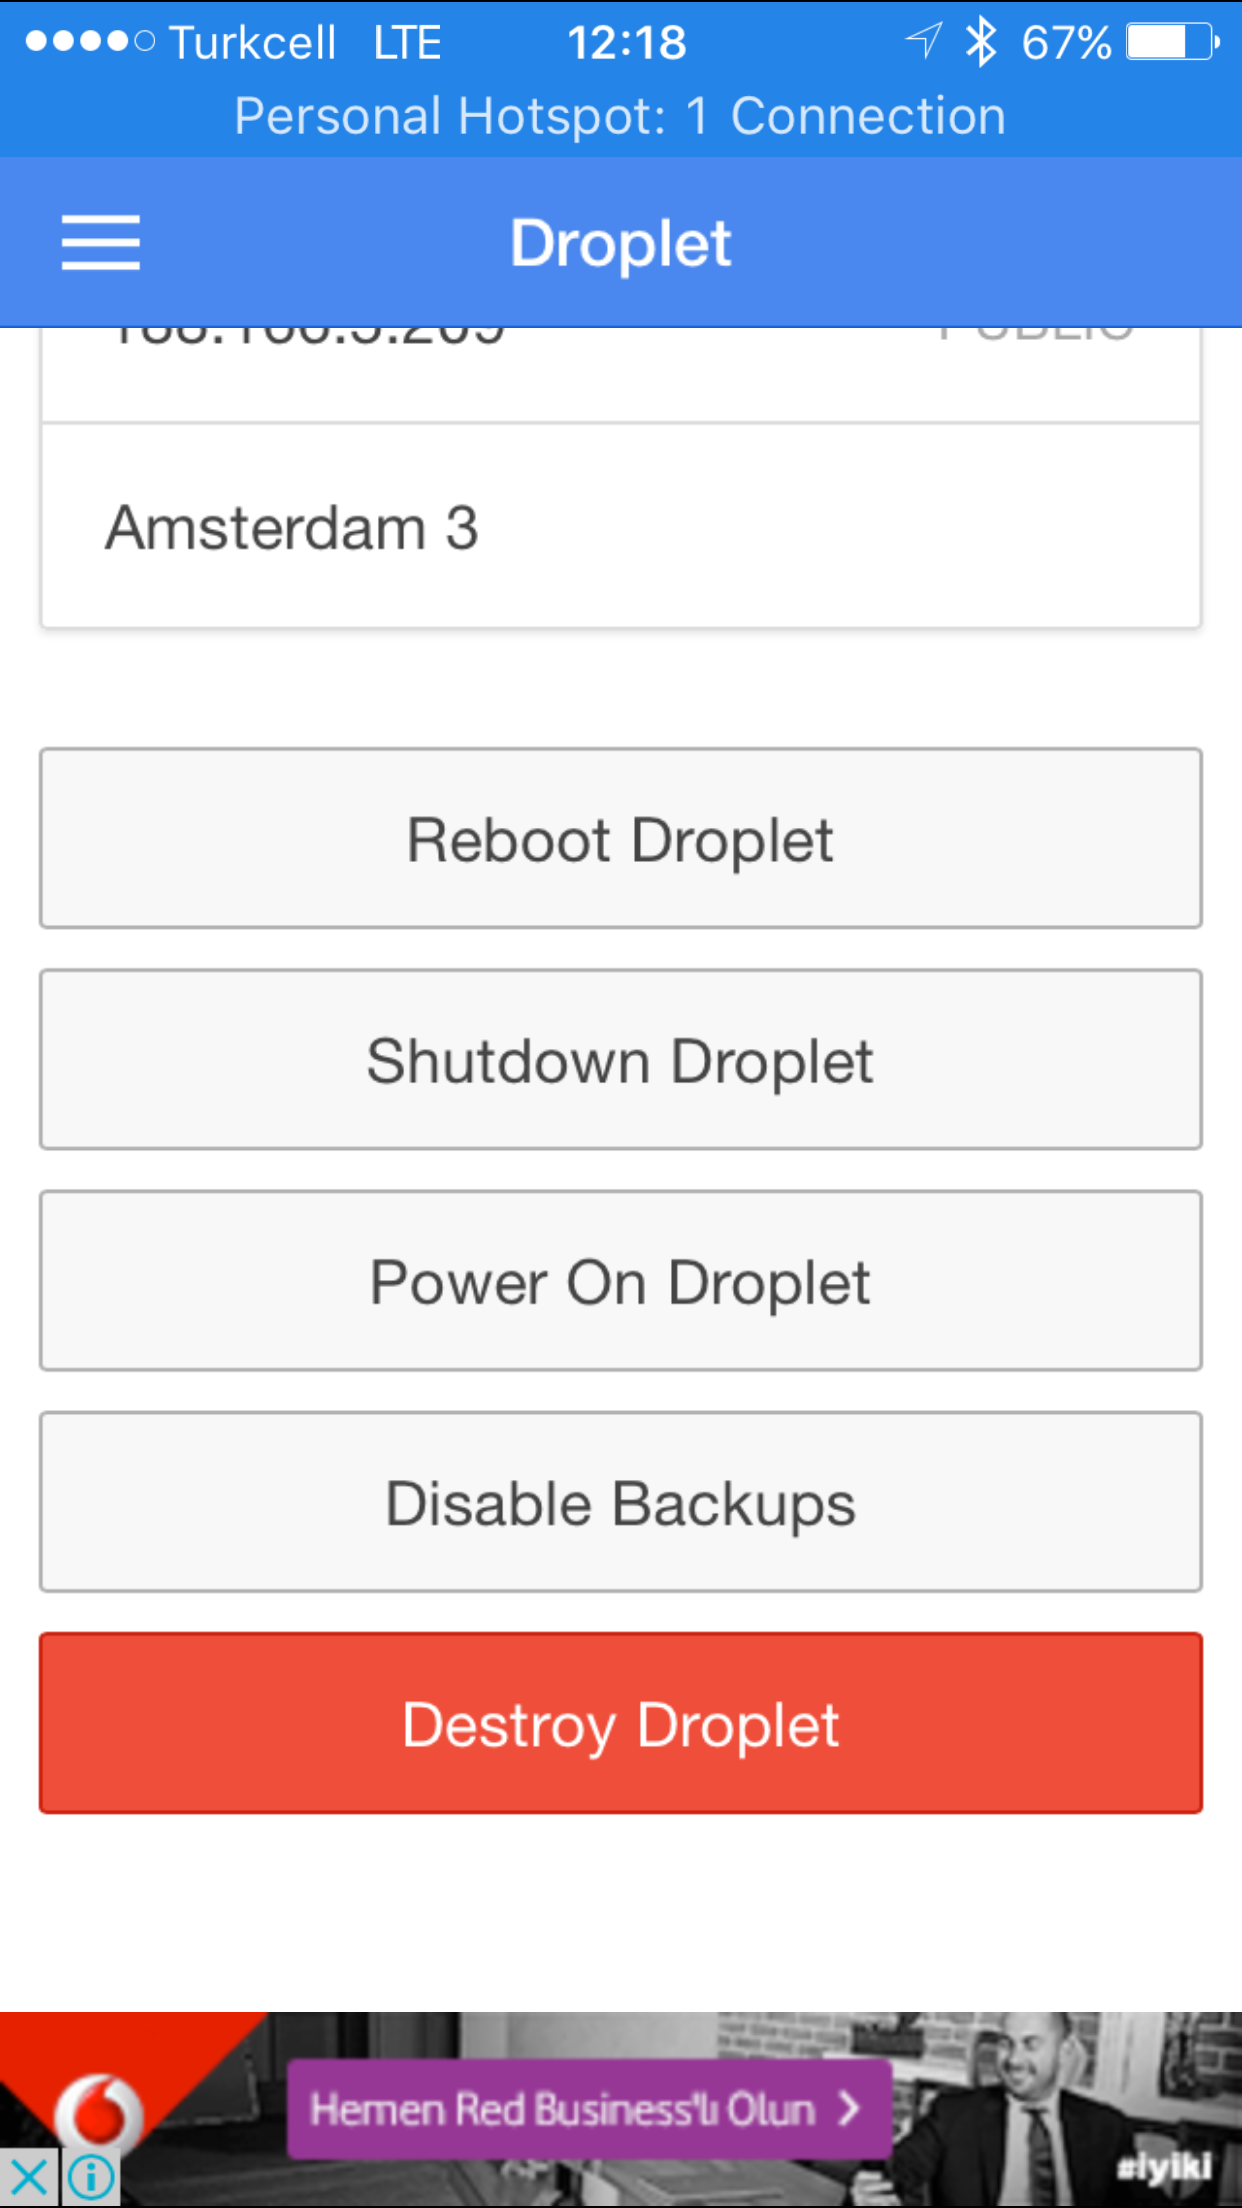
To go back to the list of droplets, we need to get back to the main menu and then hit the droplets link again. Not user friendly. We have all the options to reboot, shutdown, power on and destroy a droplet. We can also disable backups. Taking a snapshot is not available.

Droplet Actions

There is a setting called “Droplet Safe Mode”. First, I thought that it disables to destroy droplets but it does not work that way.

Safe Droplets

Actually, what it does is that, for each droplet action, it requires you to enter 0000 (4 zeroes) to complete the process. For destroying a droplet, it always wants you to enter that, regardless of the status of “Droplet Safe Mode”.

Confirmation

It is last updated on October 8, 2014.

Building a Simple RESTful Web Service and Consuming it with an iOS app

28/08/2016

Most of the projects that I work on contain two separate parts. The first one is the Java back-end. This gets the requests from the front-end and generates the outputs either in JSON, XML, PDF or XLS format. The second part is the front-end, which interacts with the user. It gets the input, presents the menus and actions and shows the output to the user. This flow is great since the two parts do not depend on each other. That way, we can swap the server side whenever and however we wish, provided that the contract between it and the UI side is preserved. That is also true for the front-end. If, somehow, the technology we preferred is not supported any more, we have the freedom to replace it possibly without changing a single line of server code.
In theory, there is no difference between practice and theory but in practice, there is. The previous paragraph seems all good in theory. But I would like to test if this is also true in practice. Nowadays, I am exploring iOS development and trying to learn Swift. Hence, my current aim is to convert one of our simple JavaScript interfaces to an iOS app. Working on a toy example will be my first step. So I started with building a very small RESTful web service. and moved on to consuming it with an iOS app.
That was a little bit strange though. I prefer using Eclipse with Maven and walked through the web service generation example accordingly and the things flew as I hoped for. However, while creating the iOS app, I hit a few problems and in this post, I would like to share my setup and solutions.

Producer: RESTful Web Service

The RESTful web service creating is in fact quite strait-forward. I have only downloaded the full code from Spring github repository. There contains three phases of the same gs-rest-service project. We will use the complete one. As always, my preference was to use Eclipse with Maven so I selected only the src/ folder and pom.xml file to copy into my workspace.

Here is the complete project

The selected code to be included

After selecting the necessary components, we need to create a project inside the workspace. Frankly, we only import the codes and Eclipse do the rest to make a project out of them. We first copy the selected codes to a project folder in the workspace. We can also put the whole downloaded Spring code and remove the folders that we do not need. Whatever way you choose, eventually your workspace will have your project folder, which only contains the src/ folder and the pom.xml file we have selected previously. Now we are ready to import them as our project.

Starting to import

We will use the wizard “Projects from Folder or Archive”. It will understand that it is a Maven project so the whole process will take too little time to complete.

Project import wizard that we will use

Maven Project

So we have our project ready to be update. Since it is a Maven project, it will be really convenient to update the project and download the jar files that the projects depends on. At the end, the whole content of the project should look like below:

The internals of the project

The code is compatible with Java 1.8 so we do not need to change anything. Up from the start, it is ready to run. First, we will run it inside Eclipse. The main() method resides in Application.java class.

Running the service from Eclipse

It has an embedded Tomcat server so we do not need to define an explicit server and deploy the project onto it. As you can see, we can simply run the main() method. This also make us to just make a jar out of it and run on different computers (having a JVM of course) by copying. To do that, we can follow my one of my previous posts and add a new running configuration.

Running mvn command implicitly

The mvn clean package command

Once you run that configuration successfully, a jar file that can be run directly by double clicking should be created under the target/ folder of your project.

The executable

Either from Eclipse or by double clicking the jar, the service starts and does nothing that can be perceived. We must somehow make a request to it and get its response. That is how RESTful services work. To test it, we only need a browser. This service only accepts one type of request and we will provide it by a URL. That principle will be the same while building our iOS app in the next steps or any other app that wants to use this service. This all means that our RESTful service made the all any other services using it independent of its internal dynamics. That is a good thing to achieve.

Testing the service

That is it. We have our RESTful server app that can even run as a standalone executable. What we see is that a JSON object. It can be thought to be a some kind of a dictionary, which will turn out to be true. When we want to get “id” information, it tells us that it is the integer 3. When we want to get the “content” information, it tells us that it is the String “Hello World!”. Any other query will yield to a nil, because there is no other key-value pair.

Now the easy and essential step is just behind, we can turn our attention to construct a way to consume it as an iOS app.

Consumer: iOS App

While coding the iOS app, I am using the Xcode 8.0 beta 6 (8S201h) build and Swift 3.0. The coding process is fundamentally the same with this tutorial. However, it is written with Objective-C and more importantly, before iOS 9 came out. Hence, we will see differences because of the language we use and also tackle with an important problem.

Single View Application

Details to be filled

We will build a very basic Single View Application. The Xcode provides us a nice wizard to create a template. You can fill in the Product Name and Organization Identifier however you see fit. At the end, we will have the following structure. We will only modify the Main.storyboard and ViewController.swift files. The others stay the same as in their creations.

The internals of iOS app

The Storyboard

Our app will have a button, which makes a request and fetches the response. After getting the response, it will identify the “id” and “content” information and put them into their respective label fields. This way, we will be sure that a network traffic has occurred, the service returned the result of our query and the app printed it successfully.

So the storyboard will contain 5 labels. The two of them will be filled by the app but the remaining 3 are fixed. The fixed ones are just placeholders to identify the fields we will be updating. The board will also include an action button.

View Controller

It is not the best practice to make network calls inside a view controller but to keep things as simple as possible and focus on our main objective, I will follow the same steps as in the Spring tutorial.
The outline of the controller code is:
– Generate the query URL
– Asynchronously (that is critical) send the query to the RESTful service.
– When a response comes from the service, check it if it is successful.
– If so, parse it with a JSON parser
– If not, write the error to the console
Writing to console is meaningless to the users of the app since they will not have the opportunity to see any of that. Logging it to a file or presenting it as a message to the user should be the way to go. Here we will only print it to our console for again simplicity.
The input/output (i/o) operations of any app requires special consideration. The fluidity of interfaces, especially in iOS apps and Apple products, is may be the biggest indicator about the quality of the app or platform. Not to hinder that butter smooth interaction, the apps should handle the background i/o tasks as least obtrusive as possible. Especially network interactions depend on many parameters that can easily fail or take too much time to succeed. It is nearly impossible to run them on the same thread which also takes care of the GUI.
The solution is using asynchronous i/o. What goes on is that, the app sends whatever information it wants to send in another thread and waits for the answer while user interaction still goes on the main thread. That way, the user is not required to wait for the answer indefinitely. Rather, she can continue to use the other features of the app, interact with it device and when the response is ready, the waiting thread can process it or asks any other thread (even to the main one) to process it.
For this purpose, we will be using session.dataTask() method. There are two thing that we must know about it.
– First, it always starts in a suspended state. So, only making a declaration and initialization is insufficient. We must explicitly tell it to start. That is where dataTask.resume()method comes in
– Second, since the timing and control of the response of the asynchronous request is out of our hands, we must provide a handler / listener type of code to the request sender. Then, it will know for sure what to do when the response comes in. For our case, a Swift closure provided as thecompletionHandler“` parameter exactly fills this very specific role.
Below is the first version of the code, which makes the request-response traffic and inspects what response has. It does not update the storyboard.

Traffic code

There are a few things to talk about before moving forward. The closures in Swift are part of codes that are self contained and can be run whenever are provided to a method. Here, the closure that we use has three parameters. error informs us if there is something going wrong. If that is ok, we got a response. This does not mean that everything is ok. We must be sure about the status of the response. There are different HTTP response codes. We can check each of them in our code for robustness. The ones with code 200 indicate the response is a success. At that time can we be sure about the data part. We simply get a dictionary version of the JSON data by means of the JSONSerialization class. So we can get the values in it by querying with the keys. This helps us in extracting the necessary information to fill in the storyboard. The whole picture after this step is below.

The code-storyboard connection

When I run this, I expected to see the id and content inside the labels in storyboard but I hit an important problem.

Uppss ATS

Actually it is not a problem but a precaution taken by Apple.App Transport Security is a security measure which defaults to blocking non-HTTPS network traffic. By the time the Spring iOS consumer tutorial was written, I think that this was not functional. But we need to deal with that now. I got the help from this post What we are to do is add exceptions inside the info.plist file. When the project is first created by the wizard, the content of the info.plist file is like this:

Default info.plist file

Step by step we will add 3 dictionaries one under another and set two parameters to TRUE. I am using localhost as my server but if you use another, feel free to change it accordingly. Here is the eventual state:

info.plist with exceptions

So we are now ready to go. Our network traffic is given permission and we can send our request and get the successful response. But there is something amiss, isn’t it?

Where is the ID?

Here, the problem is that, we ID field as a String but it is an Int in reality. Just change the code to cast it into Int as follows:

Casting to Int

Now it is an Int. Running the app again and the picture is… What?

Optional?

Swift has an interesting feature. It is called Optionals. It protects the developer not to deal with unknown or nil data. In our case, since the dictionary returns totally optional objects, the Int we got is actually an Optional Int. We clearly, and unintentionally, see that in our little label. While casting it into Int, we must state that, that object is always different than nil. We guarantee it with the Exclamation Mark symbol. Here is the very small but important change in the code.

Little mark does what we want

At last here is our thought to be simple but turned out to be a valuable example app in all its glory.

The final

I just learnt a lot both in the server Java application and in the iOS app. I will definitely try to implement more on these. Hope you also had fun.

Getting Git Projects to Eclipse & Maven

28/07/2016

One way to learn what is happening in open source Java world is following the trends. It is also one of the few places where you can work with enthusiastic engineers that you cannot work in your professional life.
While I was skimming through them, a project got my attention. That would be my first attempt to put my hands on the code so I was unaware of the check out procedure. I have Eclipse Neon and know a few things about Maven and git. So I could easily get the code and run it with Eclipse and Maven. As it turned out, it was not as easy as that.

Checking out Maven Projects

The Maven GitHub can be checked out by using Maven New Project wizard inside Eclipse. To do that, first, be sure that your Eclipse installation contains the Maven plugins. I almost always use the Eclipse IDE for Java EE Developers and that includes necessary packages for Maven integration.

Importing the project

Importing the project from GitHub.

Check out

Checking out a Maven project.

Missing SCM

Here, there is a problem. By default, there is no Source Control Manager connector in Eclipse or in its plugins. It is the reason that makes the combobox before the URL empty. Without a proper connector, we cannot check the projects out of that manager.
As you can also see, there is a not about it on the lower right corner. It informs us that we can download connectors from Marketplace. That is where we will look for the git connector.

git connector

m2e-egit is the one that we will install. To me, a few connectors like for git or SVN should come preinstalled but at least there exists a solution.

Installation

Standard installation procedure for Eclipse plugins.
After the installation, we can see the git connector inside the SCM combobox. As the URL, we input the git repository.
However, we cannot get the projects instantly. Before that, there is a one more step to make the whole thing work seamlessly. Eclipse helps us on the following adjustments as you can see below:

The SCM
Maven plugin connectors
Extension Installation
Installation Details
Licenses

After all these, we can check out the projects inside our specified GitHub repository. Here are the projects:

The projects

The EGit User Guide is my primary knowledge source about working on GitHub with Eclipse. Moreover, I got great help from Stephen’s Blog. He talks about other problems that he encountered so may be you also would like to check that post too.