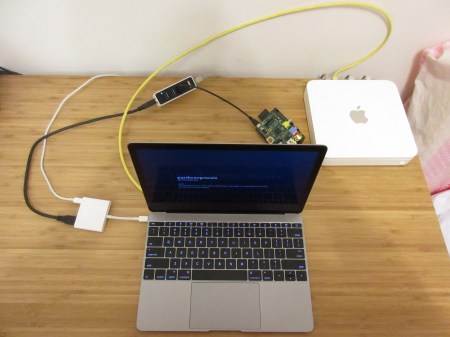
My aim is to setup the whole single node Hadoop system with only minimal hardware, which consists of a Raspberry Pi (let me call it RPi), Mac and a router. Here it is:
As my operating system, I chose Raspbian. The version should not be that important. I preferred Jessie.
At my first attempt, I downloaded the NOOBS version. However, I was not able to put that on its feet. I think the problem was trying to go headless. The key ingredient of headless setup is Secure Shell (SSH). With both the Mac and RPi on the same network, we should access the RPi remotely by means of SSH. Therefore, a pre-installed operating system, with preferably SSH, is very handy. Hence, I got the full Jessie zip, which is about 1.33GB.
Although it is a .zip file, we must use the Unarchiver app. The built in Archive Utility app doesn’t work. Another important point is, the unzipped OS exceeds 4GB! It is around 4.33GB actually. I was not able to copy it into a 4GB SanDisk SD. All the time, I got the “short write on character device” message. From my experience, a 8GB SD card is required.
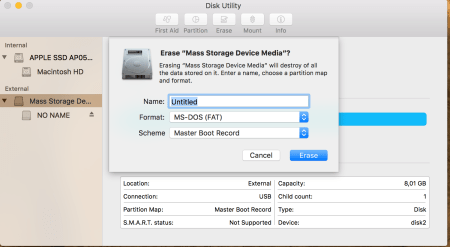
With Disk Utility, I formatted it as below:
The next step is to learn the disk number of the SD card. Just run the command in Terminal.
diskutil list
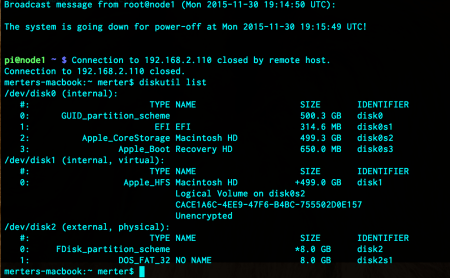
Here, “/dev/disk2” points to the SD card, so the disk number we will use is 2. The disk should be unmounted and the image we downloaded must be written over it. The next two commands just do these:
diskutil unmountDisk /dev/disk2
sudo dd bs=1m if=/Users/merter/Downloads/2015-09-24-raspbian-jessie.img of=/dev/rdisk2
The copy operation should take a while. If you encounter any problem, please check the the official installation guide to solve possible problems. If everything goes well, eject the SD and insert it to RPi. Now it is time to boot RPi and connect to configure it.
Up until now, I was sceptic about the SSH installation coming with Jessie. In fact, there was no need to fear. It was up and running when the RPi starts. But how do we know that? Frankly, I was planning to apply the method explained in here. But it failed. This made me search and find the exact tool we need: IP Scanner! With this, I was not only able to learn the IP of RPi but also the ports and the services running on them. The “Port Scan” operation in the lower right combo box “Network Tools”, produces this:
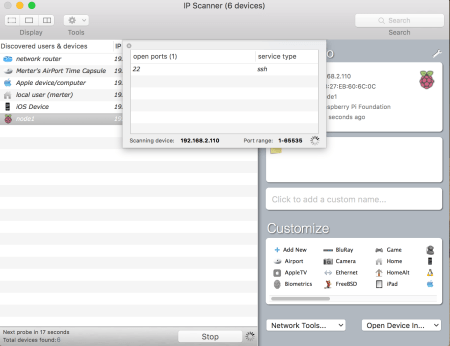
The IP Scanner I downloaded was the free version. It shows up to 6 devices. This should be enough unless your wireless devices eat up all those slots. If so, left them out of your network for a few minutes. We will need the Home Edition most probably later but for the time begin, free version does the job.
From the terminal of Mac, we can just type
ssh pi@192.168.2.110
The default user is “pi” (without quotes) and the default password is “raspberry” (without quotes) The first thing I did was to run the configuration tool:
sudo raspi-config

I “Expand Filesystem” (1) and “Change User Password” (2) for the default user pi. Also, I gave 16MB RAM to the GPU. That can be arranged under “Advanced Options” (9), followed by “Memory Split” (A3). If you have an RPi 2 or would like to overclock, you can get in to “Overclock” (8) and select the appropriate speed and voltage setting. I advise to choose “Internalisation Options” (5) and “Change Time Zone” (I2) according to your geographic location.
To update the installed components of Raspbian Jessie, I run these two commands:
sudo apt-get update
sudo apt-get upgrade
That was it! Here is a brand new machine running Raspbian Jessie OS. We can use this RPi for any purpose we want. The next post will be about installing and configuring a single node Hadoop on our RPi.
