Before starting the Hadoop installation, there are a few steps that we need to be sure of. The java version should be 7 or 8.
java -version
will show the installed java run time environment. If, for any reason, we cannot run it, or java 6 or below is displayed, we can get the required version by
sudo apt-get install openjdk-8-jdk
After this, renaming the RPi hostname and assigning a static IP for it will be very helpful. We can create/modify the /etc/hostname file. The name node1 can be a good candidate since we will use a few more RPis.
sudo vi /etc/hostname
The raspi-config menu contains the hostname change mechanism under “Advanced”(9) and “Hostname” (A2).
We can assign a static IP by appending the following to /etc/dhcpcd.conf file.
sudo vi /etc/dhcpcd.conf
interface eth0
static ip_address=192.168.2.110
static routers=192.168.2.1
static domain_name_servers=192.168.2.1
I gave my values here, but please change yours according to your network information. Restarting RPi will be required. If you somehow modify /etc/network/interfaces file, your RPi will have 2 IPs, one is the static you provided, the other is the dynamic. To eliminate the dynamic one, we are to apply the aforementioned solution.
The other how to web sites talk about modifying /etc/resolv.conf file. I did not do anything about it and, at least for the single node setup, I didn’t hit any problems.
Next step is preparing the Hadoop user, group and ssh. The three commands below create hadoop group, add the hduser to that group and enable the hduser to do super user operations.
sudo addgroup hadoop
sudo adduser --ingroup hadoop hduser
sudo adduser hduser sudo
The last command will trigger a set of options. First, we need to form a password for the hduser. I left the other options blank. Now it is time to login with our new hduser. From now on, we will be working as it.
Since ssh is the main medium of coordination, the hadoop users must ssh to other nodes and their localhost without a password.
ssh-keygen -t rsa -P ""
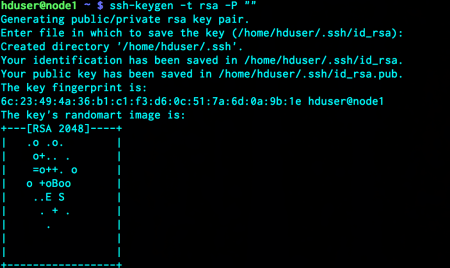
I left the file location as is. We need to copy that file (~/.ssh/id_rsa.pub) as ~/.ssh/authorized_keys
cat ~/.ssh/id_rsa.pub >> ~/.ssh/authorized_keys
Let’s check if we can ssh localhost.
ssh localhost
We are asked to add localhost as a known host. That’s ok. In our second login with hduser, there shouldn’t be any questions to be asked. Even a password is not required. That’s what we wanted to achieve.
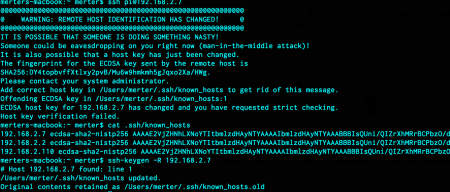
There exists a small but important modification that should be done after making these changes. The first time we logged in to RPi by ssh, a key is generated for that IP and stored inside ~/.ssh/known_hosts file of your Mac. When we changed the hostname and assign a static IP, I definitely advise you to remove the previous ssh key. Let’s assume that the first IP we found by IP Scanner and used to ssh was 192.168.2.7. Run the command below on your Mac terminal.
ssh-keygen -R 192.168.2.7
The other RPis that we will utilise have a chance to be assigned the same IP by the router. It if happens and we want to ssh to the new RPi, we will get the following error:
If all goes well, login with the default user pi.
We can move on to install Hadoop. The release page will present a few versions. I chose 2.7.1 How should we download it to RPi? We get the main file from the server using the command line (terminal) of the RPi:
wget http://ftp.itu.edu.tr/Mirror/Apache/hadoop/common/hadoop-2.7.1/hadoop-2.7.1.tar.gz
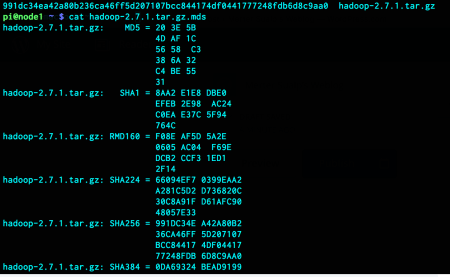
It is best practice to check the integrity of the file after download. A quick shasum check should work. To do that, also get the SHA-256 information:
wget https://dist.apache.org/repos/dist/release/hadoop/common/hadoop-2.7.1/hadoop-2.7.1.tar.gz.mds
After downloading both, run the commands to see that they both are the same.
shasum -a 256 hadoop-2.7.1.tar.gz
cat hadoop-2.7.1.tar.gz.mds
Do not delete the downloaded file. We will use it for the second RPi.
Now since we are ready, we can unzip the hadoop zip file. I preferred to install it under /opt/. You can choose anywhere you like.
sudo tar -xvzf hadoop-2.7.1.tar.gz -C /opt/
The default directory will be named after the version. In my case, it became /opt/hadoop-2.7.1/. You can change anything you like. I am sticking with this one. The owner:group of the newly created folder should be hduser:hadoop
sudo chown -R hduser:hadoop /opt/hadoop-2.7.1/
Now we can login with hduser again. From now on, it will be our only user to work with.
There should be a file named .bashrc in the home directory of hduser. If not, please create it. This file works every time hduser logs in. We will define exports in here to use hadoop commands without specifying the hadoop installation location each time. Append those three exports to .bashrc file.
export JAVA_HOME=$(readlink -f /usr/bin/java | sed "s:bin/java::")
export HADOOP_INSTALL=/opt/hadoop-2.7.1
export PATH=$PATH:$HADOOP_INSTALL/bin:$HADOOP_INSTALL/sbin
You do not need to logout. Simply run
To test the setting, we can try to learn the hadoop version we are installing
hadoop version
The Hadoop environment information resides in hadoop-env.sh file. We must provide the three parameters. To edit it
sudo vi /opt/hadoop-2.7.1/etc/hadoop/hadoop-env.sh
Search for the following export statements and change them accordingly.
export JAVA_HOME=$(readlink -f /usr/bin/java | sed "s:bin/java::")
export HADOOP_HEAPSIZE=900
export HADOOP_DATANODE_OPTS="-Dcom.sun.management.jmxremote $HADOOP_DATANODE_OPTSi -client"
There is another set of files under the same folder, which contain parameters about the location of file system and its name (core-site.xml), map-reduce job tracker (mapred-site.xml.template), Hadoop file system replication information (hdfs-site.xml) and YARN services connection information (yarn-site.xml).
In core-site.xml, add the following properties between <configuration/> tag:
  <property>
    <name>hadoop.tmp.dir</name>
    <value>/hdfs/tmp</value>
  </property>
  <property>
    <name>fs.default.name</name>
    <value>hdfs://node1:54310</value>
  </property>
This shows where the Hadoop file system operation directory resides and how to access it.
In mapred-site.xml.template, add the following property between <configuration/> tag:
<property>
    <name>mapred.job.tracker</name>
    <value>node1:54311</value>
 </property>
Here, the host and port of the MapReduce job tracker is defined.
In hdfs-site.xml, add the following property between <configuration/> tag:
 <property>
    <name>dfs.replication</name>
    <value>1</value>
  </property>
Normally, HDFS produces 3 replicas of each written block by default. Since we have only 1 node for the time being, we should set that parameter to 1 not to get unnecessary error messages.
In yarn-site.xml, add the following properties between <configuration/> tag:
 <property>
    <name>yarn.resourcemanager.resource-tracker.address</name>
    <value>node1:8031</value>
 </property>
 <property>
    <name>yarn.resourcemanager.address</name>
    <value>node1:8032</value>
 </property>
 <property>
    <name>yarn.resourcemanager.scheduler.address</name>
    <value>node1:8030</value>
 </property>
 <property>
    <name>yarn.resourcemanager.admin.address</name>
    <value>node1:8033</value>
 </property>
 <property>
    <name>yarn.resourcemanager.webapp.address</name>
    <value>node1:8088</value>
 </property>
As the very last step, we will create the HDFS operation director, set its user, group and permissions and format it.
sudo mkdir -p /hdfs/tmp
sudo chown hduser:hadoop /hdfs/tmp
sudo chmod 750 /hdfs/tmp
hdfs namenode -format
We are ready to start the services and run our first job! The services will be run by:
start-dfs.sh
start-yarn.sh
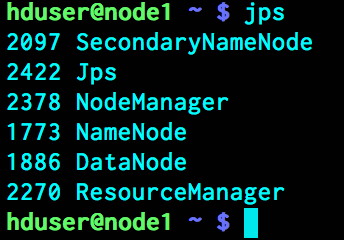
To check the running processes, run
jps
We are good to go. We will run the word count example on two different files. You can download them, thanks to Widriksson. If you download them on your Mac, use the following command to copy them to RPi over ssh.
scp Downloads/hadoop_sample_txtfiles/smallfile.txt hduser@node1:smallfile.txt
We have the files on our local RPi disk. We need to copy them to HDFS. For that, we start to use the Hadoop command line. A complete guide for it is here and here.
hdfs dfs -copyFromLocal smallfile.txt /
hdfs dfs -copyFromLocal mediumfile.txt /
The job we will run is put into hadoop-mapreduce-examples-2.7.1.jar. In fact, all Hadoop jobs are in some jar file. So the general mechanism running Hadoop jobs is always the same.
hadoop jar /opt/hadoop-2.7.1/share/hadoop/mapreduce/hadoop-mapreduce-examples-2.7.1.jar wordcount /smallfile.txt /small-out
The Hadoop jobs, generally, get an input file and create an output folder. If the output folder already exists, it will throw an exception. Therefore, delete the output folders before rerunning the jobs.
hdfs dfs -rm -R /small-out
To make comparisons, I run Hadoop 2.7.1 on RPi2 Model B and Hadoop 2.6.0 on Virtual Ubuntu 14.04 LTS, which resides on MacBook 2015 1.3GHz. The latter spent 20 seconds for smallfile.txt and 48 seconds for mediumfile.txt. On the other hand, RPi needs 20 seconds for smallfile.txt but 4:10 for mediumfile.txt. Of course there is only one node and we have not optimized Hadoop yet.
The next post will be about adding the second RPi to our hadoop stack.


 That location may be the weakest construction point on the lid of Macbook, I do not know, but keep an eye for those kind of deficiencies. I lowered the height by using D in place of F but it does not hold as powerful as F. There is no such problem on the other side of the clip. My iPad and iPhone are ok.